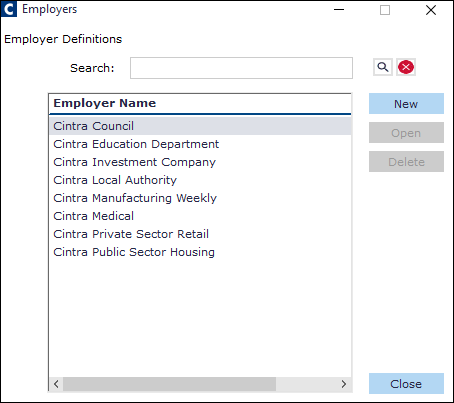
Cintra iQ allows you to have more than one employer (Company) within a database. When creating a new Employer, you would enter the Main Details which are the contact details etc., enter the bank details HMRC payments are to come from, create the tax references and payrolls under each tax reference, flag if they are a small employer and record auto enrolment details such as staging date etc.
Go to Cintra iQ: Payroll > Payroll Setup > Employer Setup.
About the Employer window
Main Details tab
Within this tab, you can enter basic details of the Employer (Company).
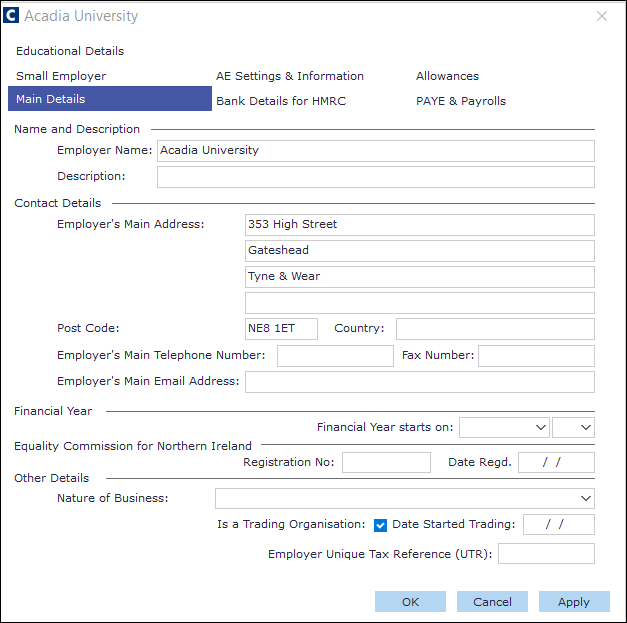
Name | Description |
|---|---|
Name and Description | Enter the Employer's name and its description. |
Contact Details | Enter the employer's Address and communication details. |
Financial Year | Select the date on which the employer's financial year starts. |
Equality Commission for Northern Ireland | Enter the Registration Number and the Date in which the Registration was issued. |
Other Details | Record the nature of the company's business by selecting from the drop down. You can flag whether the company is a Trading Organisation by selecting the check box and enter the date the trading started. |
Enter your Employer Unique Tax reference (UTR) code to claim Construction Industry Scheme (CIS) deductions as a subcontractor, on your EPS. |
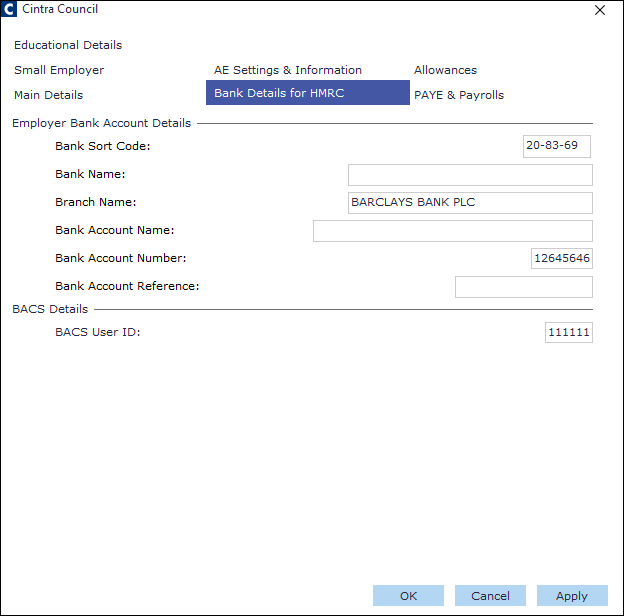
Bank Details for HMRC tab
Within this tab, you can enter the company's Employer Bank Account Details for HMRC and BACS Details.
PAYE & Payrolls tab
Within this tab, you can create a PAYE scheme and associate a payroll to the scheme.
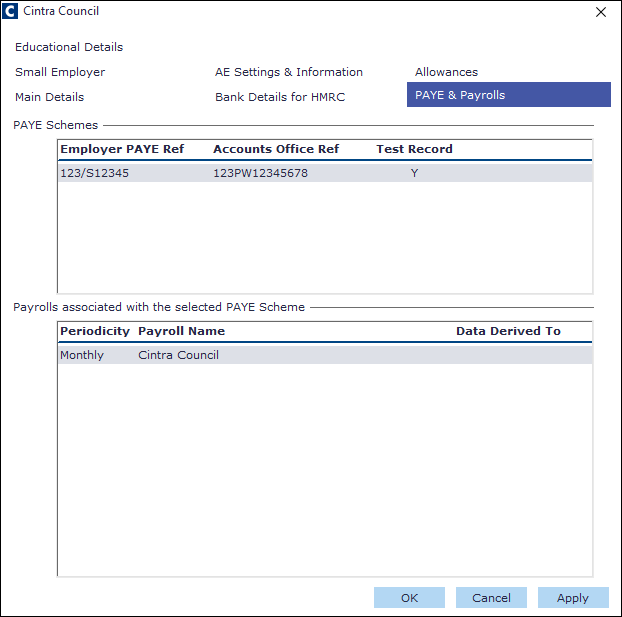
Once you have created multiple Payrolls for an employer, you can transfer an employee between payroll memberships by moving the employee from one payroll to another payroll, providing the PAYE reference number is the same for all payrolls. For more information about transferring employees, see How Do I Transfer Employees to Alternative Payrolls.
PAYE Scheme form
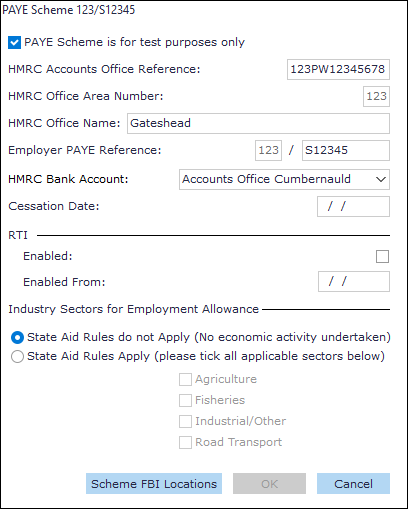
Fields
Name | Description |
|---|---|
PAYE Scheme is for test purposes only | Select this if you do not want to send the details to HMRC. |
HMRC Accounts Office Reference | This reference code must contain 13 characters: (3Numeric2Alpha8Numeric) with 4th character either P or X. |
HMRC Office Area Number | This field is automatically populated by the first 3 characters of the HMRC Accounts Office Reference code. |
HMRC Office Name | Enter the Tax Office name if it is known, but it is not mandatory. |
Employer PAYE reference | The first section is pre-populated by the first 3 characters of the HMRC Accounts Office Reference code. Enter the remaining details. |
HMRC Bank Account | Select either Accounts Office Cumbernauld or Accounts Office Shipley. |
Cessation Date | Enter the date in which the PAYE scheme ceases to be active. |
RTI | Use this section to enable the RTI submission within the PAYE Scheme and set the date in which it is enabled. IMPORTANT! Once the RTI is enabled, it should not be disabled except in very special circumstances. Contact Cintra Support for more information. |
Industry Sectors for Employment Allowance | If you want to claim Employment Allowance, you must record the industry sector in which you work by flagging the appropriate sector in the desired PAYE Scheme. You can select one, several or all sectors, which can be Agriculture, Fisheries, Industrial, or Road Transport. |
Buttons
Name | Description |
|---|---|
Scheme FBI Locations | Use this button to open the PAYE FBI Locations window to enter Scheme FBI details for the particular scheme. This is useful if you wish to have different Inbox/Outbox folders for each PAYE scheme you use. Within the PAYE FBI Location window, you can choose the XML File location for the FileBy Internet.xml file via the FBI Directory button. You can also delete the file locations en masse via the Delete button. |
FBI Directory | Click this button to access the Browse for Folder window in order to choose an XML location for the FileBy Internet.xml file. |
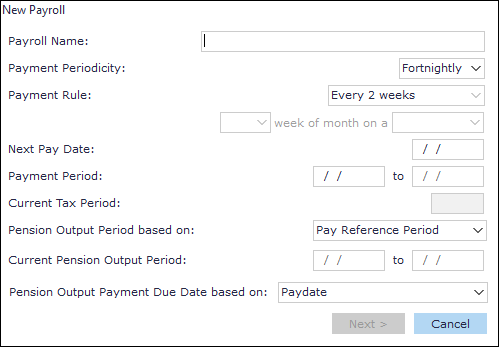
Associating payrolls to a PAYE scheme
Within the Payrolls associated with the selected Payrolls pane, you can create a new payroll and associate it to a PAYE Scheme.
Fields
Name | Description |
|---|---|
Payroll Name | Enter the name of the payroll. |
Payment Periodicity | Select either Fortnightly, Lunar, Monthly, Weekly, or Quarterly, or Annual. Depending on which you select, you may need to select a Payment Rule. (e.g. a specific date day in the month or year). |
Payment Rule | Selecting from this drop down determines when in the month, payment occurs. Select either First day of Month, Last day of Month, Regular Monthly, or Specific Day of Month. NOTE: If Regular Monthly is selected, then select the specific week and day regular payments are made. eg Last week of the month on a Thursday. |
Next Pay Date | Enter the actual date in which the payment occurs. |
Payment Period | Enter the start date of when the pay period occurs and the period end date is automatically entered. |
Current Tax Period | This field is automatically populated. |
Pension Output Period based on Current Pension Output Period | By selecting either Pay Reference Period, Pay Period or Custom Period and entering the start date and end date, you are able to synchronise the pay period dates with the dates required in order to produce membership and contribution files for the Pension Provider. |
Pension Output Payment Due Date based on | Select from one of the following:
For more information, see Pension Output Payment Due Date options below |
Payroll details
You can set up the main details, additional details and default payroll tasks.
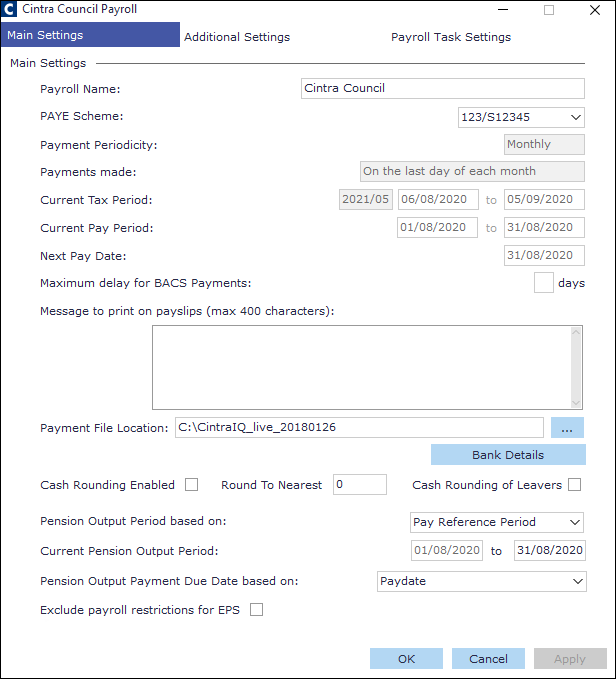
Main Settings tab
Within the Main Settings tab, you can set up the main payroll details and a general message to print on the payslips.
Fields
Name | Description |
|---|---|
Payroll Name | Enter the name of the payroll. |
PAYE Scheme | If there are more than one pay schemes, select the desired scheme. |
Payment Periodicity Payments made Current Tax Period Current Pay Period Next Pay Date | These fields are automatically populated from the previous New Payroll form entries. |
Maximum delay for BACS Payment | Not used. |
Message to print on payslips (max 400 characters) | Enter a message that will appear on the payslips. |
Payment File Location | Browse to the desired location from where the Payment File is saved. |
Cash Rounding Enabled | Select to enable cash rounding |
Round to Nearest | Enter the desired value. |
Cash Rounding of Leavers | Select to enable cash rounding for leavers. |
Pension Output Period based on Current Pension Output Period | By selecting either Pay Reference Period, Pay Period or Custom Period and entering the start date and end date, you are able to synchronise the pay period dates with the dates required in order to produce membership and contribution files for the Pension Provider. |
Pension Output Payment Due Date based on | Select from one of the following:
For more information, see Pension Output Payment Due Date options below. |
Exclude payroll restrictions for EPS |
Buttons
Name | Description |
|---|---|
Bank Details | Use this button to enter the bank account details from where the salary money is taken. |
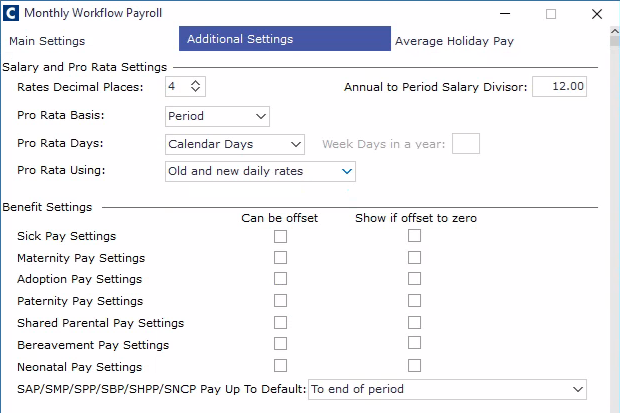
Additional Settings tab | Within the Additional Settings tab, you can set Salary and Pro Rata details, Benefits, Holiday Pay Rate Calculations, and Default Work Pattern. |
Additional Settings - Fields
Salary and Pro Rata Settings
Name | Description |
|---|---|
Rates Decimal Places | To specify a number of decimal places to be used when calculating rates. |
Annual to Period Salary Division Figure | Enter a value to calculate the period amount from Annual i.e. 12 for months, 52 for weeks to 2 decimal places. |
Pro Rata Basis | Select either Annual or Period. |
Pro Rata Days | Select either Calendar Days, Weeks Days or Work Days. By choosing Week Days, you can enter a value for the number of Week Days in a year. |
Pro Rata Using | Select either Old and new daily rates, New minus daily rate difference, or Old plus daily rate difference. For more information, see Employer Pro Rata Methods. |
Benefit Settings
Name | Description |
|---|---|
Sick Pay Settings Maternity Pay Settings Adoption Pay Settings Paternity Pay Settings Shared Parental Pay Settings Bereavement Pay Settings | Can be offset: If the other gross pay is being paid, then any SSP, MPS, APS, PPS, SPPS, or BPS can be offset against this at employee level. Show if offset is zero: Where SSP, MPS, APS, PPS, SPPS, or BPS payable is equal to the SSP, MPS, APS, PPS, SPPS, or BPS offset and adds up to zero, the offset is not printed on the payslip. This is the default setting. |
SAP/SMP/PP/SBP/SHPPay Up to Default | Use this drop down to select when in the pay period the benefit is paid up to. Select either To end of period or Last whole week prior to the end of period. |
Benefit Settings
Use this section to set your holiday pay rate calculation. For more information, see Preparing Average Holiday Pay Rate Settings.
Name | Description |
|---|---|
Other Settings
Name | Description |
|---|---|
Default Work Pattern | Use this drop down to assign a default work pattern to the Payroll. |
Buttons
Name | Description |
|---|---|
Email Contacts | Use this button to set up email contacts, which will be accessible when actioning a Payroll Workflow option in Payroll Workflow. For instance, you can create a single action for a group of payrolls and send reports out to different contacts that were set up here. For more information about setting up Payroll Actions, see Guide: Payroll workflow. |
AE Pension Settings | Use this button to postpone the automatic enrolment a period of your choice of up to three months or 13 weeks. You can apply postponement settings for each payroll |
Payroll Task Settings tab
Within the Payroll Task Settings tab, you can set up default tasks for the individual payroll. For more information about default tasks, see Payroll Tasks and Employee Tasks - Check List.
Small Employer tab
Employers can qualify for Small Employer Relief (SER) for SMP/SAP/SPP/ShPP. A small employer is one who’s total gross Class 1 NICs, including primary (employee) and secondary (employer) liability, is at or below a set annual threshold, in the qualifying tax year. For this calculation, gross Class 1 NICs exclude:
Class 1A
Class 1B,and
any NICs rebate.
For more information about SER, see https://www.gov.uk/hmrc-internal-manuals/statutory-payments-manual/spm182000Use this tab to flag if your company qualifies for SER. Within the SER (Small Employers' Relief) pane, you can perform the following:
Create a new SER record.
Edit an existing SER record.
Delete an existing SER record.
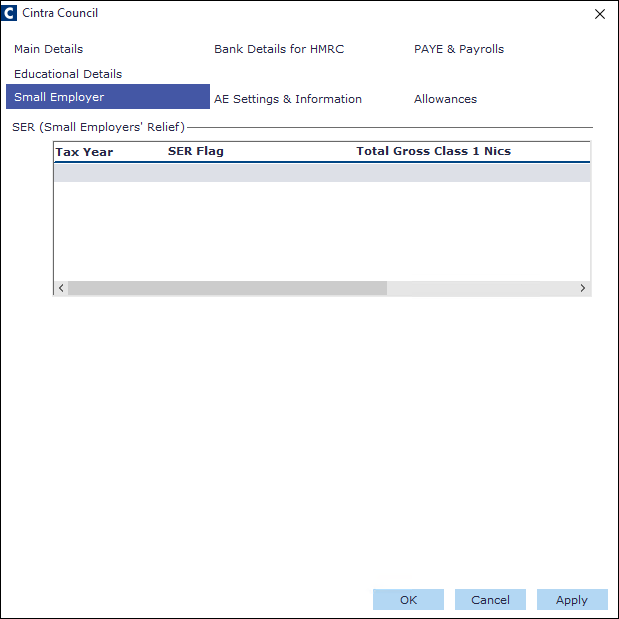
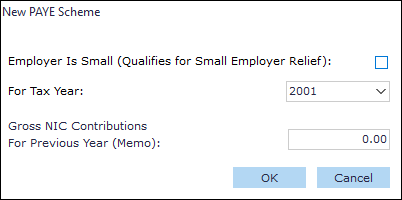
The Small Employer form
Within this form you can determine whether the employer is small for a particular tax year. You can also enter the Gross NIC contributions for the Previous Year.
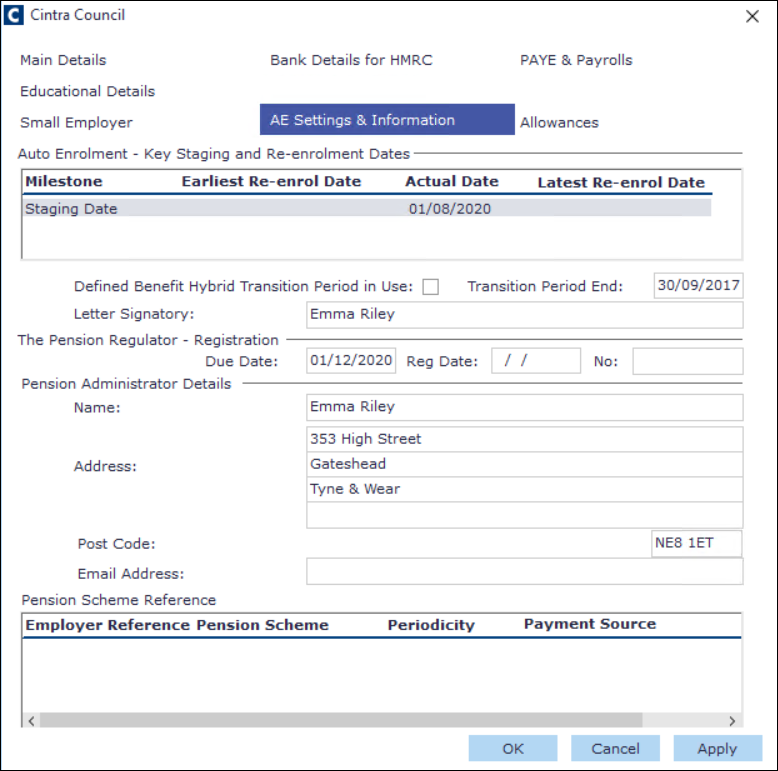
AE Settings & Information tab
Within the AE Settings & Information tab, you can set up the following:
Auto Enrolment - Key Staging and Re-enrolment Dates
Pension Regulator Registration Details
Pension Administrator Details
Pension Scheme Reference.
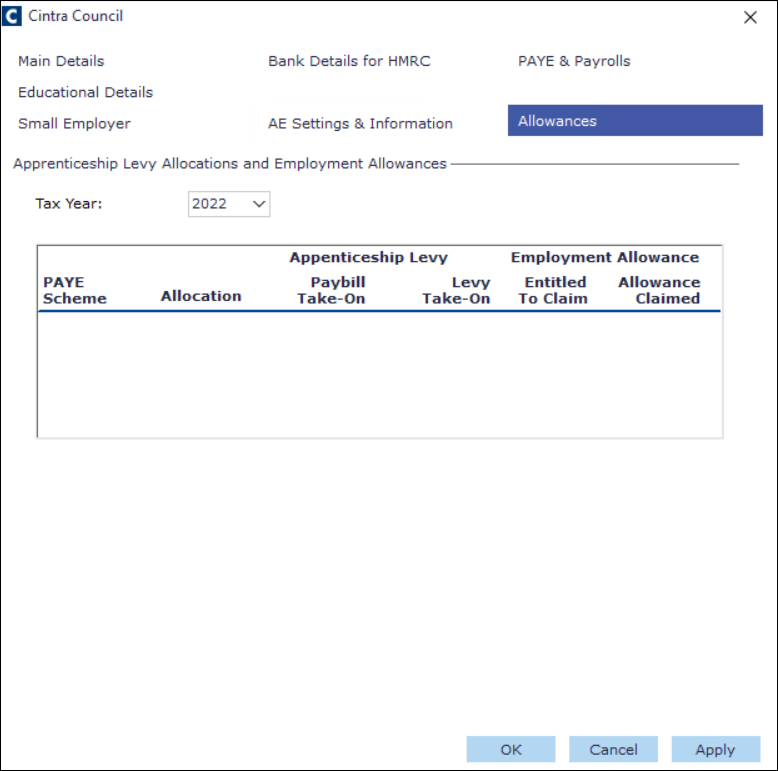
Allowances tab
Within the Allowances tab, you can allocate Apprenticeship Levy (AL) Allowances and Employment Allowance across your company’s PAYE schemes.
The AL Allowance will be offset against any AL due for a scheme. For more information, about Apprenticeship Levy (AL) Allowance, see How do I Allocate the Apprenticeship Levy (AL) Allowance to PAYE Schemes?
If you are eligible, you can reduce your annual National Insurance liability up to £4000 by allocating Employment Allowance to PAYE Schemes. For more information, see How Do I Allocate Employment Allowance to PAYE Schemes?
Education Details tab
Within the Education Details tab, you can set up Education and/or Further Education details for the payroll.
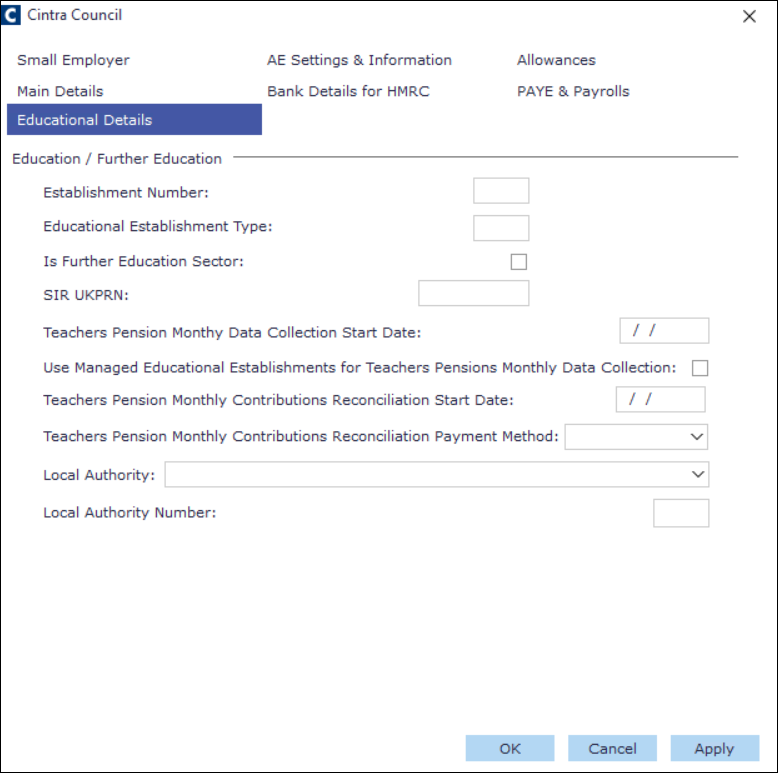
Name | Description |
|---|---|
Establishment Number | Enter the reference number of the educational establishment. |
Educational Establishment Type | Enter the code that represents the type of educational establishment that is attached to the payroll. |
Is Further Education Sector | Select if the establishment is part of the Further Education Sector. |
SIR UKPN | This entry can be selected in the SIR Workforce Data window. For more information about the SIR Workforce Data , see Compiling SIR Returns. |
Teachers Pension Monthly Data Collection Start Date | Enter the start date of the monthly data collection for the Teachers Pension. |
Use Managed Educational Establishments for Teachers Pensions Monthly Data Collection. | Unchecked: The Local Authority number and Education Type number will be taken from the Education Details tab. Go to Cintra iQ: Payroll > Payroll Setup > Employer Setup > Employer window Checked: The Local Authority number and Establishment Type number will betaken from the employee's SIR Details window. Go to Cintra iQ: Personnel Records > Forms > Teaching Details |
Local Authority | Select the desired Local Authority. |
Local Authority Number | The Local Authority Number automatically appears. |
Pension Output Payment Due Date options
This field controls which date Cintra iQ uses as the payment due date on the pension output file. Select the option that matches what your pension provider expects. If there is a mismatch between your payroll setup and your pension provider's account setup, the file may be rejected.
Pay Period End Date: Uses the last day of your payroll pay period as the basis for calculating the pension payment due date. Cintra iQ identifies the month in which that end date falls, then calculates the pension pay date based on that month.
Example: Your payroll period runs from 1 December to 31 December. Selecting Pay Period End Date tells the system to use December (the period end date month) and if your pension is set to pay in the following month, producing a correct January pension pay date.
Paydate: Uses the actual date on which employees are paid as the basis for calculating the pension payment due date. Cintra iQ identifies the month in which the pay date falls, then calculates the pension pay date based on that month.
Example: Your payroll period runs from 1 April to 30 April and your pay date is 30 April. The system uses April as its reference month. If your pension is set to pay in the following month, the pension pay date will be in May.
Example (pay date in following month): Your payroll period runs from 1 April to 30 April but your pay date is May. The system uses May as its reference month, producing a pension pay date of in June.
Pay Reference Period End Date: The pay reference period is the calendar month in which your pay date falls. This option uses the last day of that month as the basis for calculating the pension payment due date.
In most cases this produces the same result as Paydate, as both options derive from the same pay date. This option is retained for payrolls where it was previously configured.
Example: Your pay date is 1 May (paying in arrears for April). The pay reference period is 1 May to 31 May. The system uses 31 May as its reference point. If your pension is set to pay in the following month, the pension pay date will be in June.
Custom Period End Date: Uses the last day of a custom pension output period as the basis for calculating the pension payment due date. This option is only available if you have selected Custom Period in the Pension Output Period based on field. If you select Custom Period End Date without a custom period configured, Cintra iQ will display an error.
Use this option when your pension provider requires a period that does not align with your standard payroll pay period — for example, if your payroll runs calendar months but your pension provider uses tax months (6th to 5th).
Example: Your payroll runs 1 April to 30 April, but your pension provider uses a tax month period of 6 March to 5 April. You have configured this as your custom period. Selecting Custom Period End Date tells the system to use 5 April as its reference point. If your pension is set to pay in the following month, the pension pay date will be in May.