You can update the Spine Point values within Cintra iQ by using the Import facility within Cintra iQ. In order to import the Spine Point Values, you should perform the following steps:
Note: When you import a new spine point, Cintra iQ will automatically end the existing one for each employee listed.
Step One - Extract the spine point data
In order to extract the data, you must create a listing report containing the data for the background set up.
Navigate to the Reports window for the desired Pay Spine record.
Go to Cintra iQ: Employer Settings > Pay Spines > Record in Navigator > Reports.
Ensure Pay Spines is selected as the Data File.
Click the New button. The Create Listing Report Definition window appears.
In the Listing Definition tab, enter the report's Title and select its Category.
The report will appear under this category name in the Reports window.
From the Available Fields pane, add each of the following from Selected Fields pane.
As each field is added, the Report Width automatically expands in characters.
Pay Spine Name
Spine Point Description
Spine Point ID
Spine Point Sequence
Spine Point Hist Annual Salary
Spine Point Hist From Date
Spine Point Hist Hourly Rate
Click the OK button. The report appears in the Report window's Definitions pane.
Highlight the report and click the Run button. The Filter Historice Records form appears.
Enter the As At date. This will report the current Spine Point Values.
Click the OK button. The Pay Spine report appears.
Click the Output button. The Output Destination dialog appears.
Click the Spreadsheet button. The data is exported to a spreadsheet.
Step Two - Prepare the spreadsheet for import
Open the spreadsheet that contains the Spine Point Value data.
Change the date in the Spine Point Hist From Date column to the appropriate value.
Change the amounts in the Spine Point Hist Annual Salary column.
If, for instance there is a 2% rise, then insert a new column and using the Excel formula, create the new amounts. It is recommended that once the correct values have been calculated, you should remove the formula from the fields by copying the column and saving as Save Values.
When you are satisfied with the data and ready to import, save the file in both an .xlsx format and .csv format.
This is so that if you do need to make any corrections in the future, you can easily do so in the spreadsheet format.
Continue to import the new Spine Values.
Step Three - Import the Spine Point Values into Cintra iQ
For more information about importing data, see How do I import data into Cintra iQ?
Navigate to the Import File window.
Go to Cintra iQ: File > Import > Data Import
Select Data File: Pay Spines.
Note: This is not the file containing data to be imported, but the general area in Cintra iQ that you want to import to.
Select Table to import to: Spine Point Values.
Click the Table Columns button. The Table Columns window appears.
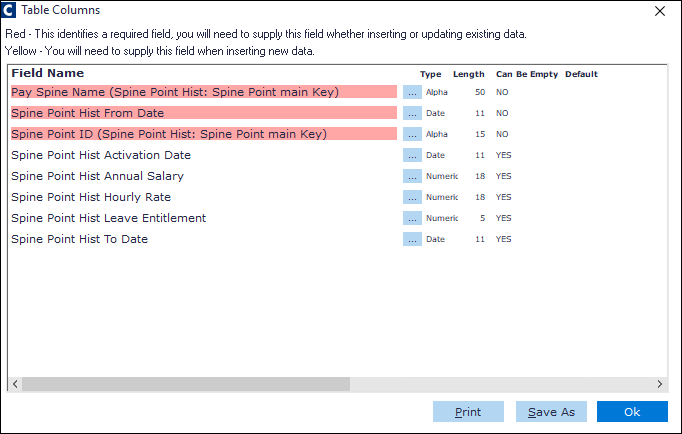
Check to see if the field names in your file to be imported matches the Field names within this window.
Note: The Field Names highlighted in Red, must be in your import file.
Click the Ok button. You are return to the Import File window.
Select the Header Line Present option. This displays the Source columns as per the selected import file.
Click the ellipsis button to browse and select your .csv file. This imports the file into the Import File's source pane so that you can see the columns of data and map them to the correct fields in Cintra iQ.
Match the Source fields to the desired details in the Destination drop downs.
Click the Next button. The data appears in the pane.
Ensure you have included all the mandatory fields for creating new records.
Click the Import button. The Error Status column displays OK. And a message appears confirming how many rows have been updated/inserted.
If there are minimal errors to be corrected, perform the update in the system. If there are several corrections to be made, return to the spreadsheet to make the changes, save the file to the .csv format, and then re-import.
Continue to save the mapping or save the data.
Step Four - Make a final check
Via report
Rerun the report you created for extracting the data.
Go to Cintra iQ: Employer Settings > Pay Spines > Record in Navigator > Reports.Cross check the figures against the original spreadsheet manually or use V-Lookup Excel functionality to check the data to the original spreadsheet data.
Via spine point details
Spot check the data.
Go to Cintra iQ: Employer Settings > Pay Spines > Record in Navigator > Spine Point Details. The new spine point value is displayed in the Spine Point History tab with the new effective date.