Thank you for choosing Cintra to submit your NEST pension files! Work through these steps to give Cintra access to your NEST account and the information it needs.
Where your NEST setup doesn't match how Cintra works, you'll need to change it in NEST.
Expand a step to see what to do and when you've finished, tick Mark this step as complete or Next step.
Your progress is saved in this browser, so you can come back to it later.
Important! Complete all these steps before you move to Cintra. Cintra can't fix historical issues in your NEST account, so these must be resolved before you move to Cintra's pension service.
Set up delegate access for Cintra
Set up a dedicated delegate organisation on your NEST account for Cintra. It's used only for automated pension submissions. Cintra may also add another team user to make sure it has full access.
When you complete the delegate form in NEST, enter these details:
Field | What to enter |
|---|---|
Name of the organisation | Cintra HR & Payroll Services |
Delegate organisation ID | TPA003338703 |
Level of access | Full access delegate or General delegate |
Find out more (link opens in a new tab):
Gather the information Cintra needs
Cintra needs the following information from your NEST account:
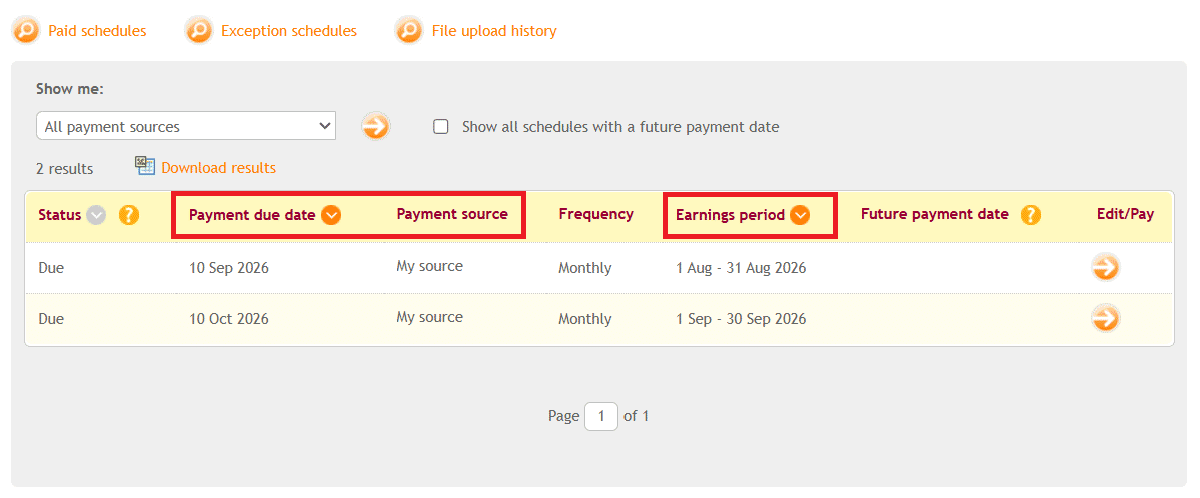
Payment due date
Earnings period
Payment source
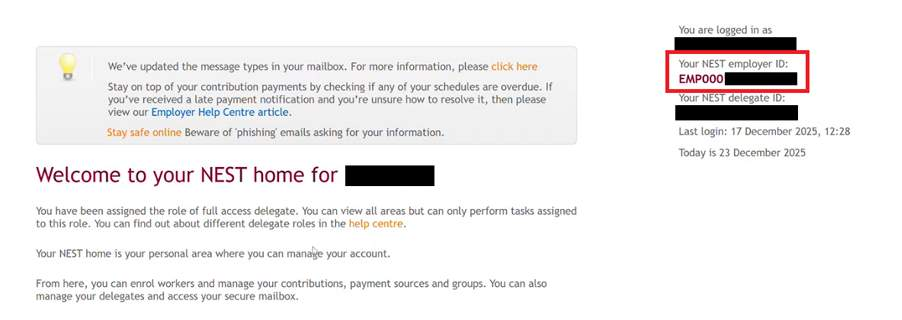
NEST employer ID
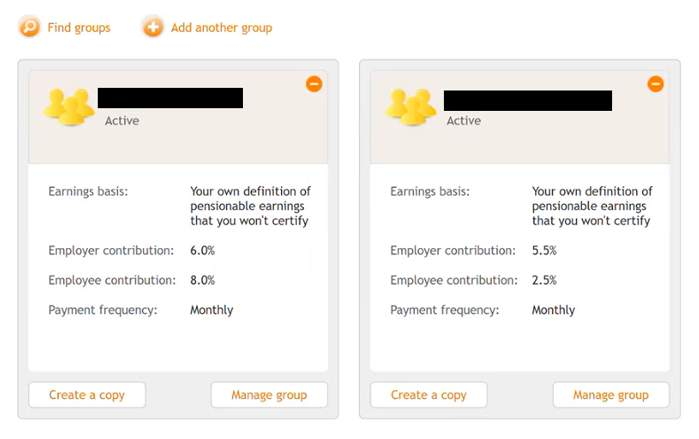
Pension groups (if applicable)
Email all this information to your Cintra contact. 📩
Payment due date, earnings period and payment source
In NEST, go to Manage contributions. The payment due date, earnings period and payment source are shown on the screen.
Once your file is submitted to NEST, payment is taken on the date you've set in the NEST portal (for example, the 10th of the following month). You won't need to authorise it again.
NEST employer ID
Your NEST employer ID is shown on the main screen when you log in to NEST. It starts with EMP.
Pension groups
In NEST, go to Manage groups to find the exact group names. If you have more than one group, send Cintra a list of your employees and the group each one is in.
Fix any legacy NEST settings
Some older NEST setups don't work with Cintra iQ. Check your NEST settings for any of these:
An earnings period that starts on the 31st of the previous month. Cintra iQ doesn't support this. Most schemes run from the 1st to the 31st, or from the 6th to the 5th.
A payment frequency of Tax monthly or Tax weekly. These frequencies are redundant.
For non-monthly payrolls (for example, weekly), a pay date set as a number of days after the period ends. This means the pay date falls on a different day of the month each time.
If any of these apply, fix them by creating a new pension group in NEST and moving your workers into it:
Copy an existing pension group instead of creating one from scratch. This saves time.
In the new group, make the change for your issue, as shown in the table below.
Click Manage workers. In the Enrolled workers list, select the relevant employees and click Change group. Select the new pension group and today's date, then click Move.
Issue | What to change in the new group |
|---|---|
Earnings period starts on the 31st | In When is your current earnings period due to end, enter the 31st. |
Payment frequency is Tax monthly or Tax weekly | In Payment frequency, select Monthly, Weekly, Four weekly or Fortnightly, depending on your payroll frequency. Don't select Tax monthly or Tax weekly. |
Pay date is set as a number of days after the period ends | In Payment due date, select A particular date, for example the 10th. Don't set it too early in the month, so there's time for processing. |
After you create the new group, you may see two contribution schedules for the same pay period. NEST suggests this one-off fix on the old group:
Submit £0.00 for one member on the old schedule, marked with Insufficient earnings.
On the payment screen, click Mark all members not yet validated with insufficient earnings to clear the remaining members.
After this, only the new pension group's schedule should appear.
Find out more (link opens in a new tab):
This guide replaces the previous version built in Articulate Rise.