This step-by-step guide walks you through setting up single sign-on (SSO) between Google Workspace (the identity provider) and Cintra People (the service provider).
For an overview of how SSO works in Cintra People, including what happens when you turn it on, see Single sign-on (SSO) overview.
Before you begin
Warning!
SSO configuration requires access to your organisation's identity provider (IdP) and a working knowledge of SAML 2.0. Incorrect settings can prevent users from signing in to Cintra.
Only proceed if you are responsible for managing your organisation's identity provider. If you're unsure, contact your IT administrator before making any changes.
You will need:
A Google Workspace Super Admin account.
User administrator credentials for Cintra People.
A public web host or cloud storage container (e.g. Amazon S3, Google Cloud Storage, Cloudflare R2, or your company's public web server).
1. Open the SSO settings in Cintra People
Sign in to Cintra People with your admin credentials.
In the side menu, expand Settings and select Company settings.
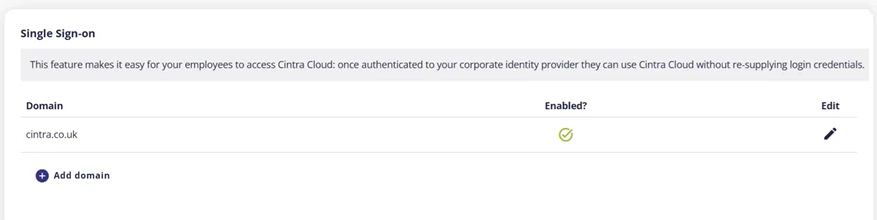
Scroll down to the Single Sign-on section.
To set up a new domain, click Add domain. To change an existing domain's settings, click its Edit icon.
Under Step 1 - Cintra configuration values, you will find the following information to paste into your IdP configuration:
Cintra ACS URL: The Assertion Consumer Service (ACS) URL is the endpoint where your identity provider sends the SAML authentication response after a user successfully signs in.
Cintra Entity ID: A unique identifier for Cintra as the service provider (SP) within your IdP. This tells your identity provider which application is requesting authentication.
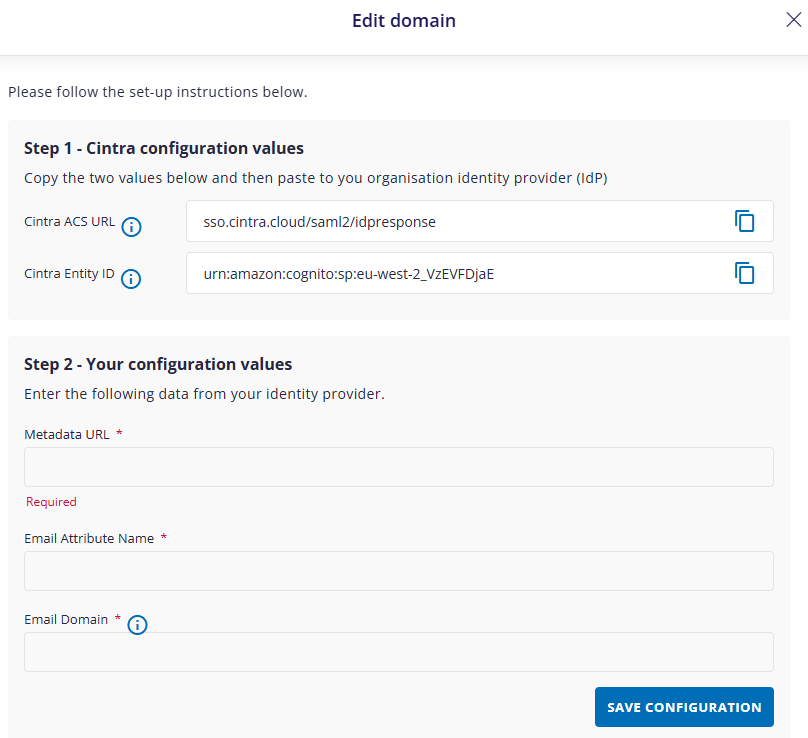
Keep this page open. You'll copy these values into Google in Step 4, and come back to complete the rest of the page in Step 7.
2. Create the SAML app in Google Workspace
Sign in to the Google Admin Console as a Super Admin.
In the left navigation panel, go to Apps > Web and mobile apps.
Click the Add App dropdown at the top and select Add custom SAML app.
In App name, enter
Cintra People. You should also upload a logo to help users quickly identify Cintra People.Click Continue.
3. Download the Google metadata file
On the Google Identity Provider details screen, click Download Metadata to save the
.xmlfile to your computer.Click Continue.
4. Enter the Cintra People details in Google
On the Service Provider Details screen, enter the following values:
Field | What to enter |
|---|---|
ACS URL | The Cintra ACS URL value from Step 1. You also need to add |
Entity ID | The Cintra Entity ID value from Step 1 |
Name ID format | Select EMAIL |
Name ID | Select Basic Information > Primary email |
Click Continue, then on the Attribute mapping page:
Click Add mapping.
Set Google Directory attribute to Basic Information > Primary email.
Set App attribute to
email.Click Finish.
5. Host the Google metadata file publicly
Because Google Workspace does not generate a live URL for its metadata files, the downloaded .xml file must be hosted in a publicly accessible web location so Cintra People can retrieve it.
Upload the downloaded Google metadata
.xmlfile to your public web host or cloud storage container (e.g. Amazon S3, Google Cloud Storage, Cloudflare R2, or your company's public web server).Make sure the file permissions are set to Public Read so Cintra People can access it over HTTPS.
Copy the direct URL to the file (e.g.
https://yourdomain.com/saml-metadata.xmlorhttps://your-bucket.s3.amazonaws.com/saml-metadata.xml).
Note: The metadata file only contains Google's public signing certificate and sign-in addresses. It doesn't contain any passwords or secret keys, so it's safe to make public.
6. Turn on user access in Google
In the Google Admin Console, open the Cintra People app you created.
Click User access.
Set access to ON for everyone, or select specific organisational units or groups.
Click Save.
Note: Changes to user access in Google can take up to 24 hours to take effect. If the test in Step 8 fails straight away, this may be the reason.
7. Enter your configuration values in Cintra People
Return to the Cintra People Single Sign-on settings page and complete Step 2 - Your configuration values:
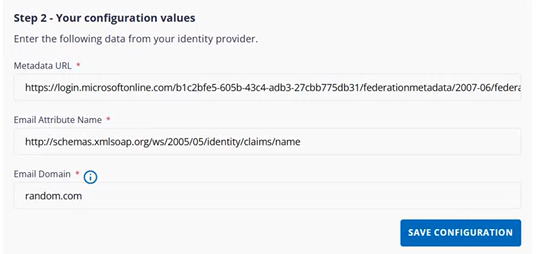
Field | What to enter |
|---|---|
Metadata URL | Paste the hosted metadata URL from step 5 above (e.g. This file contains the technical information Cintra People needs to establish a trusted connection with your IdP, including certificates and endpoint details. |
Email Attribute Name | Enter This is the name of the attribute your identity provider uses to pass a user's email address in the SAML assertion. It must match the App attribute you set in step 4 above. |
Email Domain | Enter your primary organisation domain (e.g. Cintra People uses this to identify which users should be authenticated via SSO and route them to the correct identity provider at sign-in. |
Click Save Configuration.
8. Test the connection
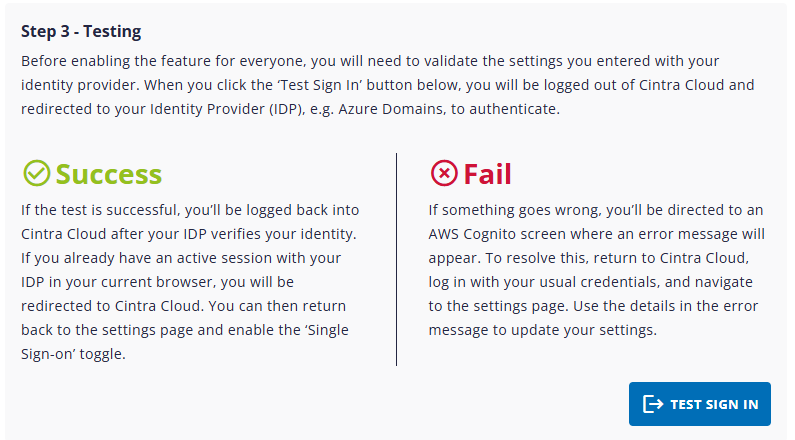
Under Step 3 - Testing, click Test Sign In.
When prompted, sign in with your Google Workspace account.
Depending on whether or not the test is successful, follow the Success or Fail steps shown on the screen.
9. Turn on SSO for all users
When the test is successful, turn on Single Sign-On to enable it for all users. To do this, click Enable SSO, then Yes to confirm. The next time any user with a matching domain signs in to Cintra People, they will not be prompted to enter their password.
Note: Any user whose email domain has not been set up for SSO will continue to sign in using their password.
With SSO enabled, clicking Disable SSO will require all users to use their passwords when signing in.
Renewing the Google certificate
SAML metadata files rarely change. The certificate inside Google's metadata is valid for 5 years. You will only need to update the hosted file when you renew the SAML signing certificate in Google Workspace.
Cintra does not automatically refresh metadata from your Metadata URL, so you will need to update your metadata manually before the existing certificate expires.
Why isn't SSO working?
If your users are unable to sign in after SSO has been configured, check the following:
Incorrect email attribute name: the value entered must match exactly what your IdP sends in the SAML assertion. For Google Workspace, this is
email.Wrong ACS URL: confirm the Cintra ACS URL was copied accurately into your IdP configuration with no trailing spaces or characters. Check that it starts with
https://.Users not assigned to the IdP app: users must be explicitly assigned to an application before they can authenticate through it. In Google Workspace, check that user access is turned on for the user's organisational unit or group (Step 6).
Domain mismatch: the email domain configured in Cintra must match the email suffix of the users trying to sign in.
Metadata file not accessible: open the metadata URL in a private browser window to check that it loads without needing to sign in.