Who can do this:
HR Manager
Administrator
You can perform the following steps in order. However, you should perform all the steps before setting up HR Essentials and HR Advanced.
Step 1: Configuration
Leave and Sickness Types
You can configure which types of Leave & Sickness employees request by setting up Leave & Sickness Types.
We have a range of default Leave & Sickness Types which you can import and use or add your own Types. Leave & Sickness Types can be set up as deducted or non-deducted, so they can affect an employee's allowance or not.
To set these up, go to Leave > Admin & Config > Leave Types or Sickness Types.
For more information, take a look at the support article on Configuring Leave & Sickness Types.

Click create and complete the details to add your own types of Leaves. Once created this will be available as a Leave Type for selection when submitting requests.
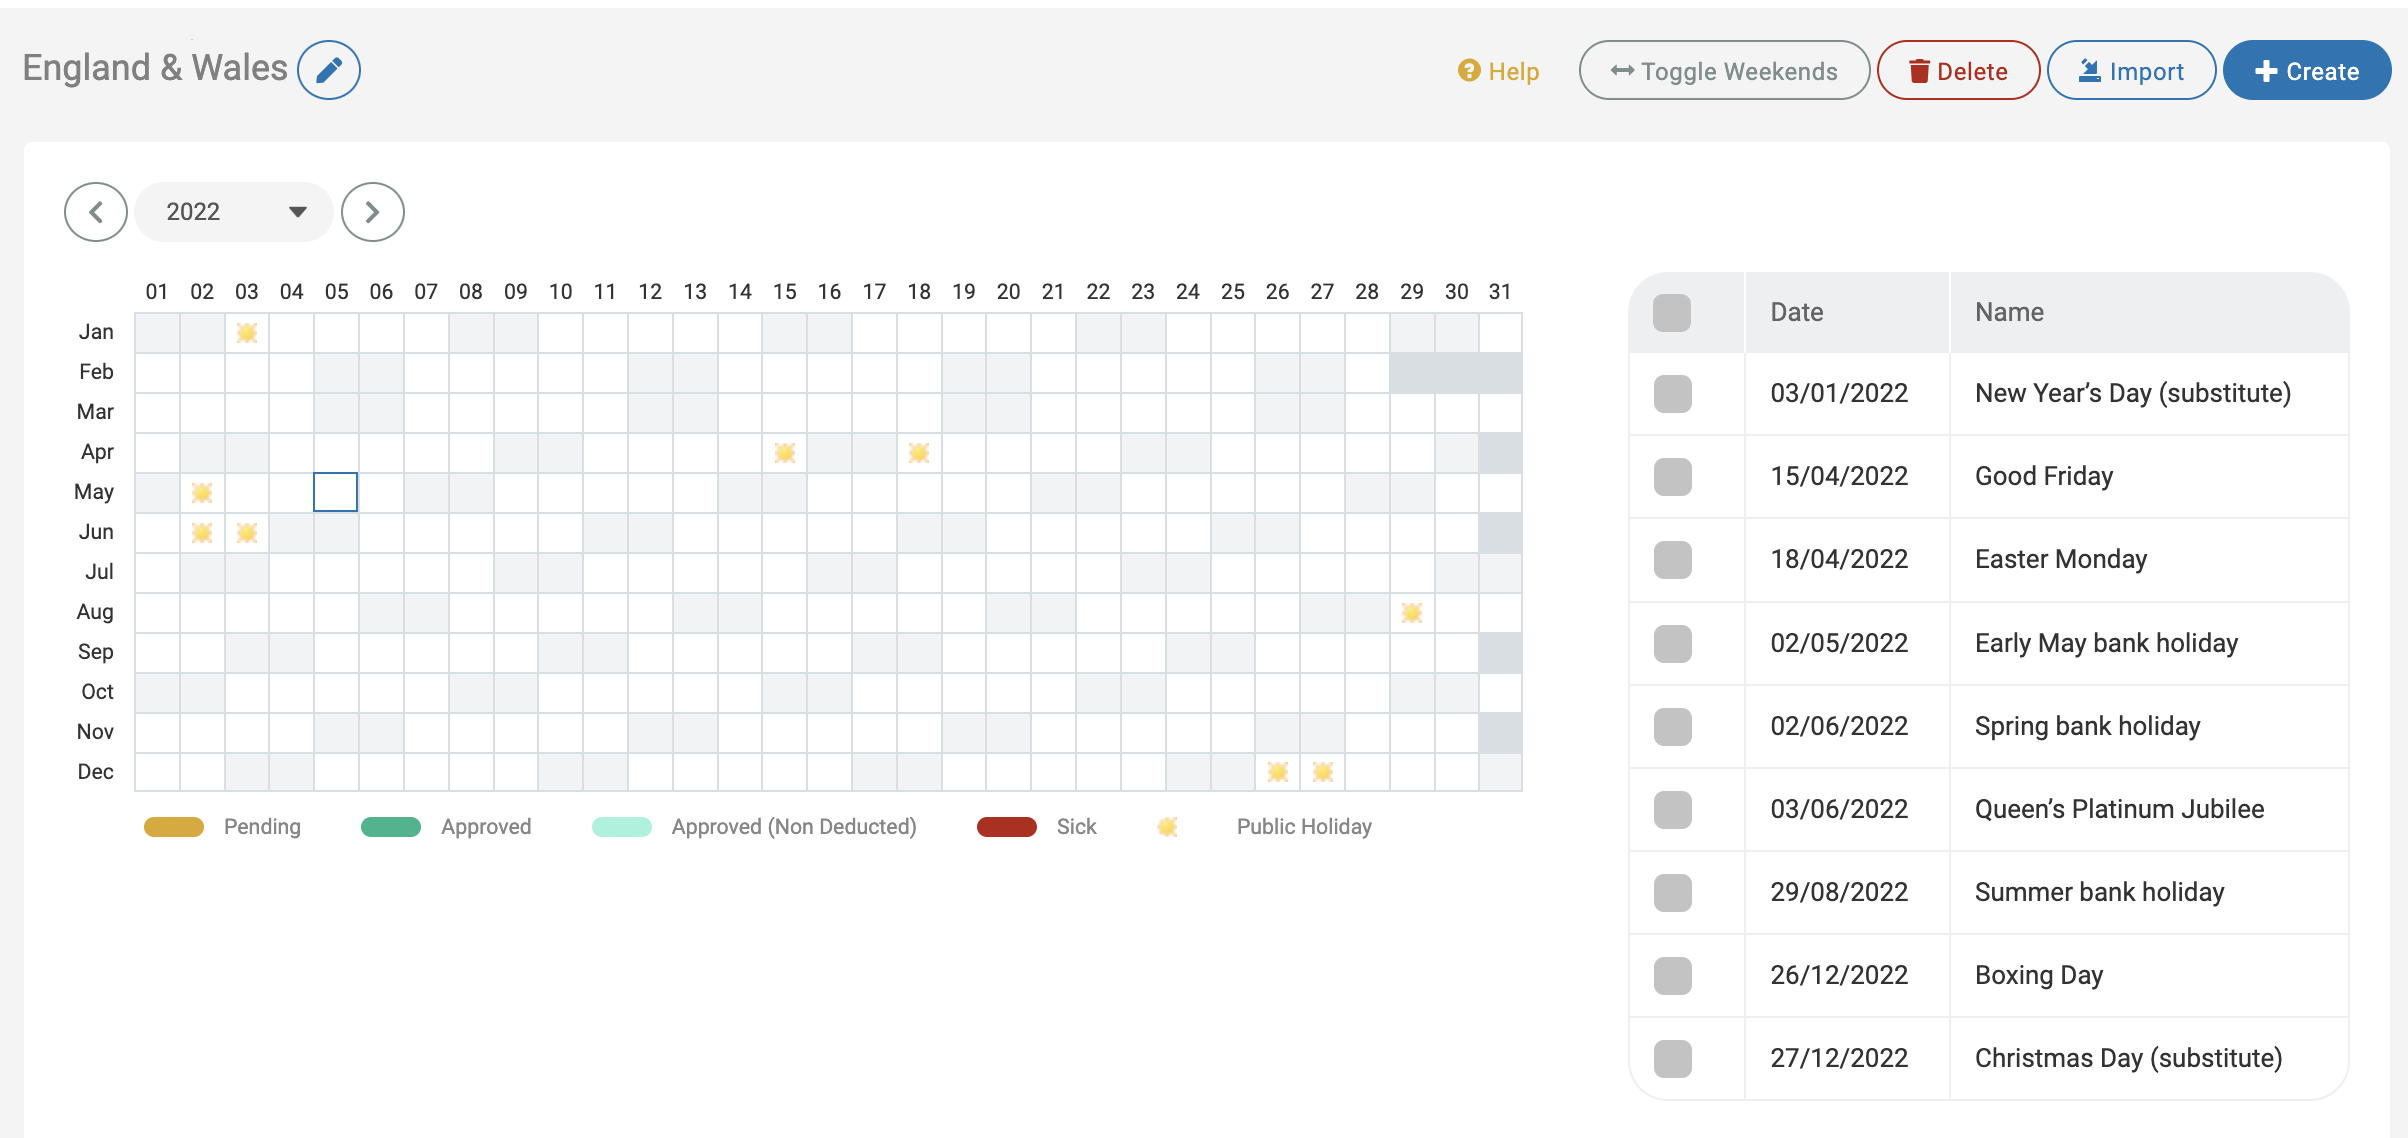
Public Holidays
You can configure public holidays which will be marked as non-working days in the calendar.
Leave has a number of Public Holidays set up as defaults. Select one for your country or create your own.
To set these up, go to Leave > Admin & Config > Public Holidays.
If you need more information, take a look at Managing Public Holidays.
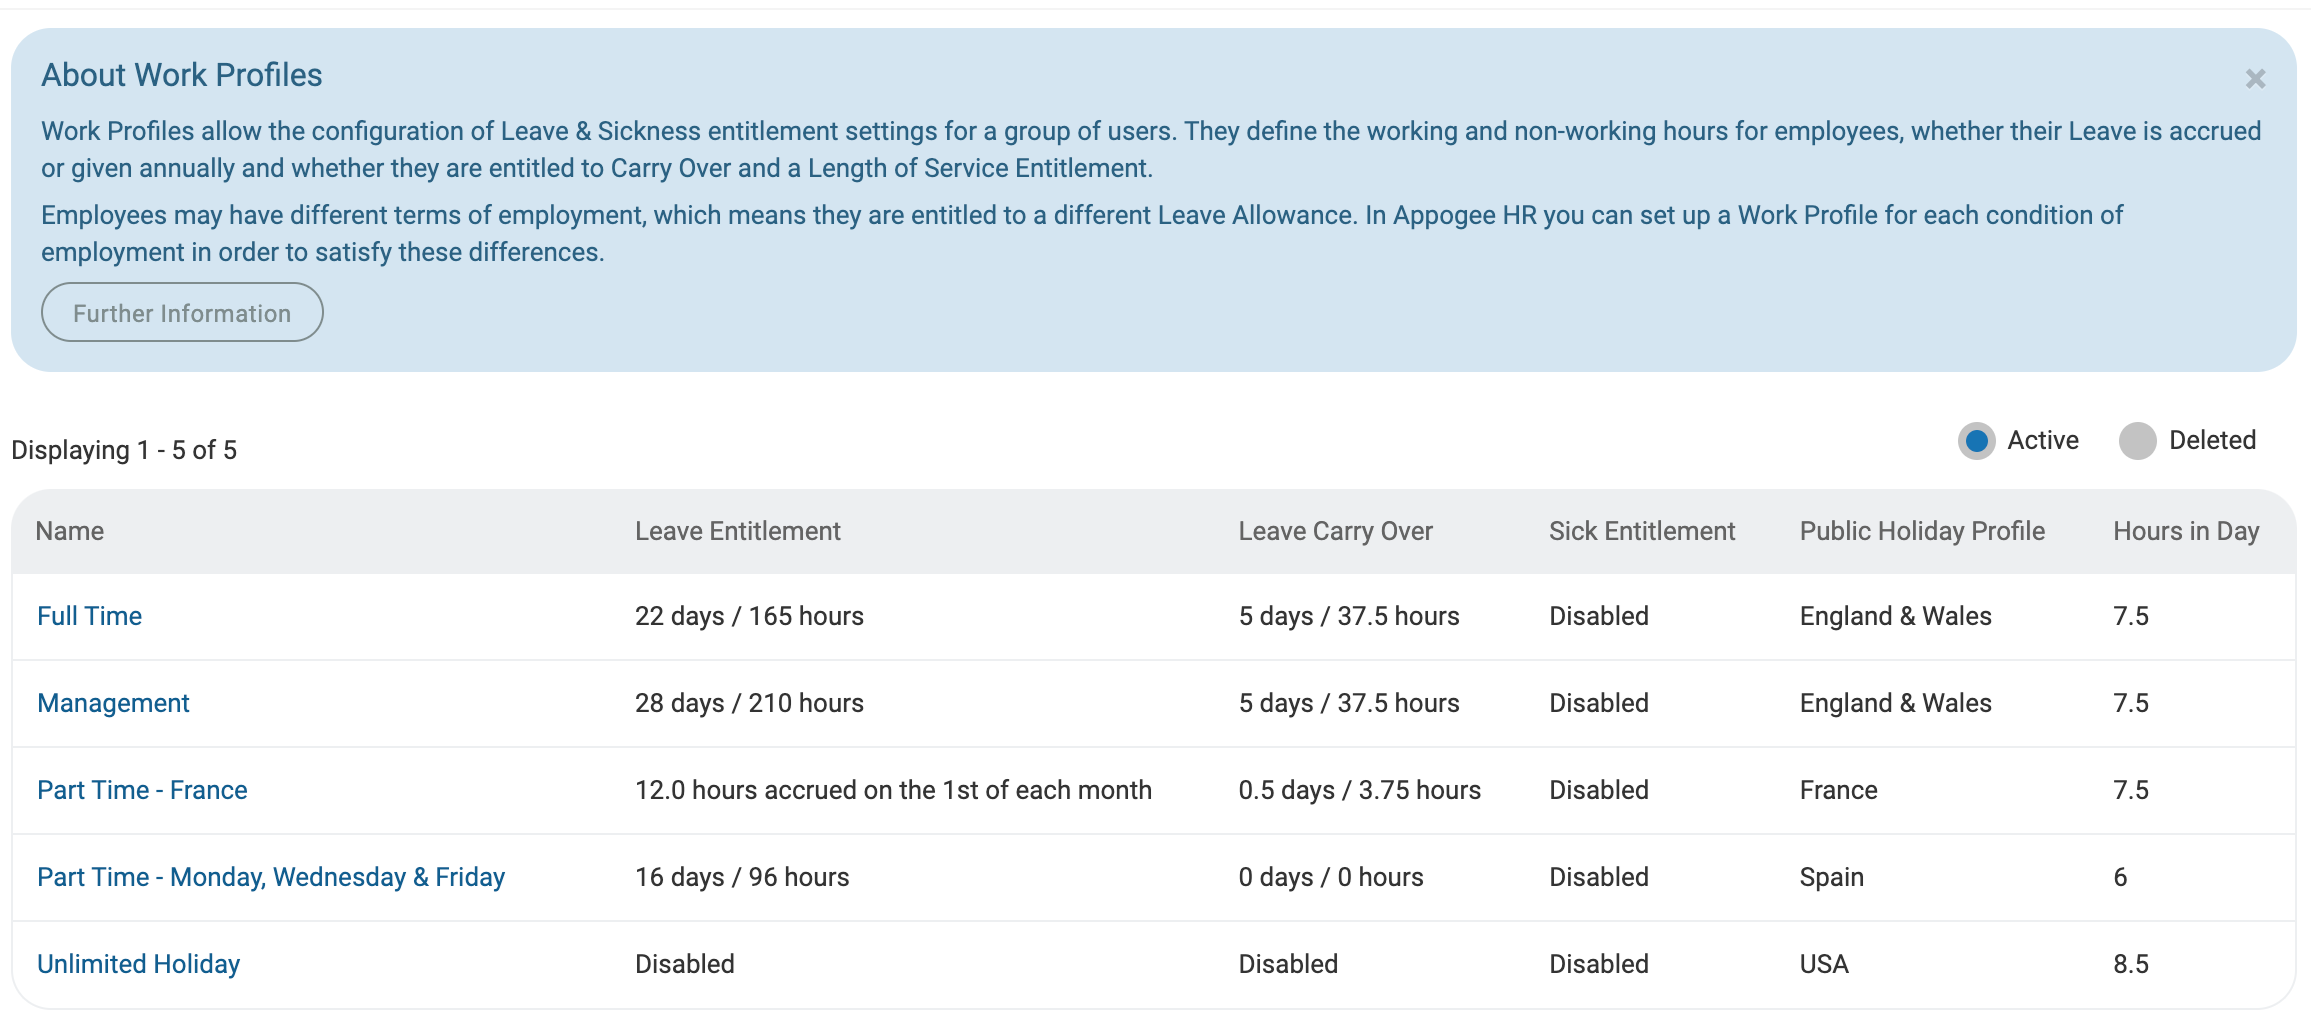
Step 2: Work Profiles
The Work Profile defines the working hours and allowances for a group of Employees. Every Employee must belong to a Work Profile, you may only need one for your organisation or you may need multiple to cater for all eventualities.
Work Profiles can be assigned upon the addition of new employees and you can have different Work Profiles for different members within a team.
Work Profiles are used to help set up the general working and Leave details of the employee such as the Leave amounts and working hours and rota and accruals.
Set these up under Leave > Admin & Config > Work Profiles > Create.
For more information, take a look at the following article: Work Profiles.
Step 3: Teams
Setting up Teams
Setting up Teams is the next logical step in setting up Cintra People HR. This is where you will set up your Approval Flows for Leave & Sickness.
Teams are set up under the Organisation option in the menu. Click the Create button on the top right to start making a new team . You can assign them colours key to help differentiate them at a glance. On team settings, you can also configure calendar access assign approval flows and add managers.
All employees must members of a team. it is possible to have multiple work profiles, managers and approvers within a single team. You can have multiple managers within a team.
See Creating & Editing Teams, Configuring your Org Chart and Deleting users & teams for more information.
Note: You will not be able to set up Managers or approval flows until you have added users to the system
.png)
It is recommended at this point to only create the Teams to set the structure - employees will not be added to the system yet so you will be unable to add members and managers until the next step.
Step 4: Add Employees
You can add employees using one of the following methods.
Manual Registration
CSV Import
Through an integration
Google Workspace (G Suite)
Office 365
Xero
1. Manual Registration
To find out more, see Adding new employees.
2. CSV Import
The CSV import enables you to add employees in bulk. For more information, see CSV Upload Guide.
3. Integrations
You will need to enable your Integration before being able to import your employees through this method.
Xero (importing your employees through Xero can be done as part of setting up the Xero integration)
Step 5: Set up Approval Flows & Team Managers
Now that your employees have been added to the system, you can assign which of them are Approvers & Managers.
Approvals are set up within Approval Flows - you can create as many different Approval Flows as necessary, Approval Flows can be assigned to Teams or Employees. This is the employee or employees to whom Sick and or Leave requests will be submitted.
Approvals flows are used to configure how your wish to set up your structure for leave requests and who submissions are sent for review and decision-making on Leave.
To create your Approval Flows:
Go to Leave > Admin & Config > Approval Flows > Create
Name the Approval Flow as needed. It can be named after a person if requests are all going to one person or a Team name if it's for a Team.
You can have multiple Approvers and levels within an Approval Flow and an Approval Flow can be assigned to multiple Teams if their requests are going to the same people.
.png)
Once you've set up your Approval Flows, you can assign these to your Teams or employees. You can have multiple approvers on an approval flow and multiples approval flows within a Team. To do this:
Go to Organisation and click the Teams tab.
In the Leave, Approvals & Calendar tab, click the Approval Flows tab.
Select the Approval Flow from the list and optionally click to override the Approval Flow for certain individuals.
.png)
Next, you'll need to assign Team Managers. These could be the same as your approvers, or you could select different Managers. From the Team page, go to the Managers tab and add the managers.
.png)
Approval Flows could also be assigned per employee. To do this:
Go to Organisation > Employees.
Select an Employee
Click the Approval Flows tab.
.png)
You can override to change to a different Approval Flows or create a new one for just that user.
Additional Set Up Options
Backfill
You may wish to use the Backfill feature within Cintra People HR to import your employees' historic requests. This will allow you to use the system as a single source of truth for the full Leave year, regardless of when you implement the feature.
For more more information, see Backfill.
Integrations
Google Workspace
By integrating with Google Workspace you will benefit from Single Sign On for your users (no need for a username and password), the ability to register Employees directly from your domain, integration with your Google Calendar, the ability to set Out of Office messages at the time of making a request and the the option to have Leave accessible from your Google Workspace Menu.
You can find out how to get integrated with Google Workspace here: Google Workspace Integration.
Office 365
By integrating with Office 365 you will benefit from Single Sign On for your users (no need for a username and password), the ability to register Employees directly from your domain, integration with your Outlook Calendar and the the option to have Leave accessible from your Outlook Menu.
You can find out how to get integrated with Office 365 here: Office 365 Integration.
Xero Payroll
The option to integrate with Xero is available if you are using the Australian, New Zealand or UK versions of Xero Payroll. The integration allows you to sync basic Employee Profile information between Xero and Leave as well as updating Leave and Sickness requests and allowances.
Information on how to integrate, can be found here: Xero Integration.