Who can do this:
HR Manager
Overview
HR Managers have the ability to record Leave for others while by-passing the approval process. Records entered this way are stored without following the approval process. Such records can relate to past absences (which can be helpful when onboarding new users) but it can also be used to populate future events on behalf of others.
Additionally, Team Managers with the Editor role will have access to manually backfill for the employees they manage. They do not have access to the Backfill from CSV tool. If you are a Team Manager with the Editor role, you can access Backfill from the Request History tab.
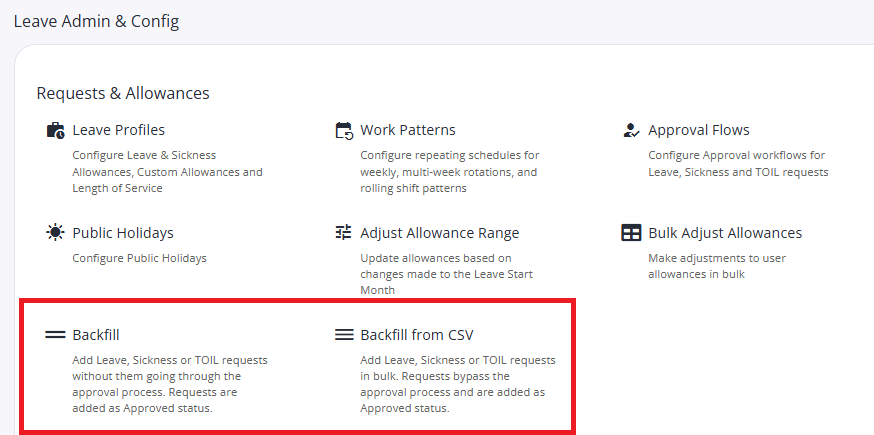
If you are an HR Manager, you can access Backfill from Leave > Admin & Config.
There are two ways you can submit backfill - either manually for an employee, per request, or in bulk for a group of employees or more than one request.
Manually adding Backfill
Type in the employee email address to select an employee to add Backfill for.
Choose the Request Type - Leave or Sick.
Select the Leave/Sickness Type from the dropdown.
Add the start and end dates and optionally configure the times (e.g. half day).
Add the reason and then click Create Request.
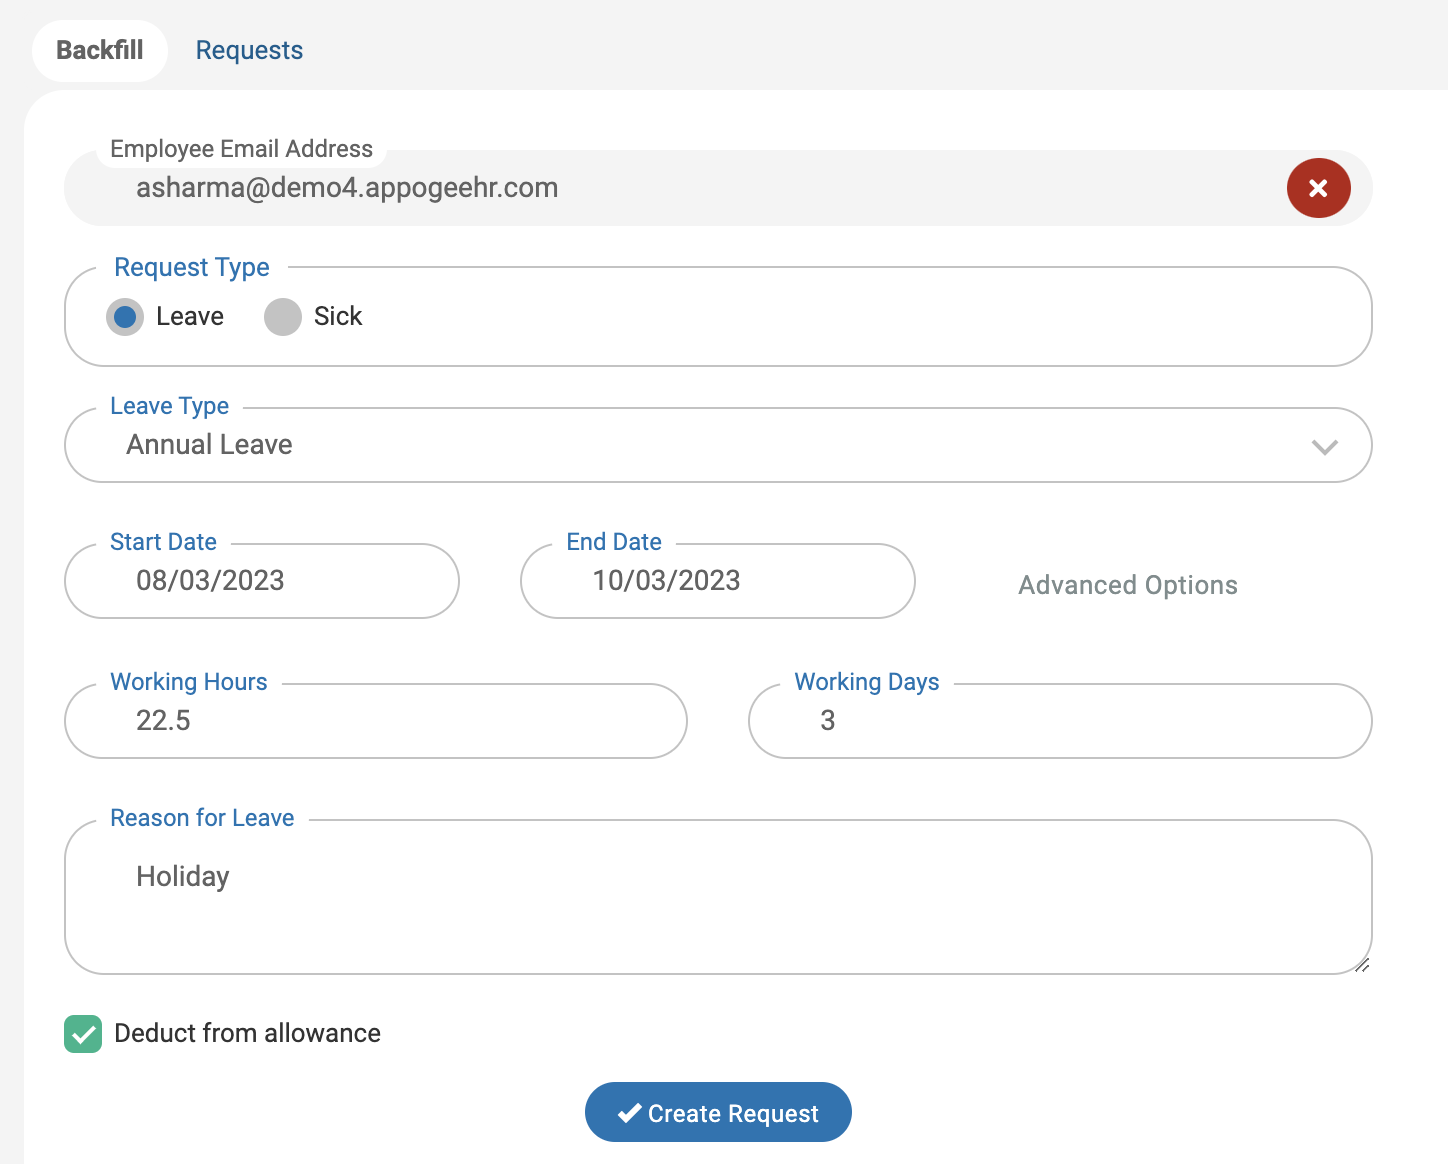
Follow this process for all requests that you need to submit for the selected employee.
You can change the employee by clicking the Change Employee button to the right of the email address.
Backfill in Bulk (from CSV)
The process for backfilling from CSV is as follows:
Download Template (exports as CSV file)
Add data in your spreadsheet software
Save as .csv file
Upload
Complete
To initiate the process, go to Leave > Admin & Config > Backfill or Backfill from CSV.
Click 'Download' to start the process.
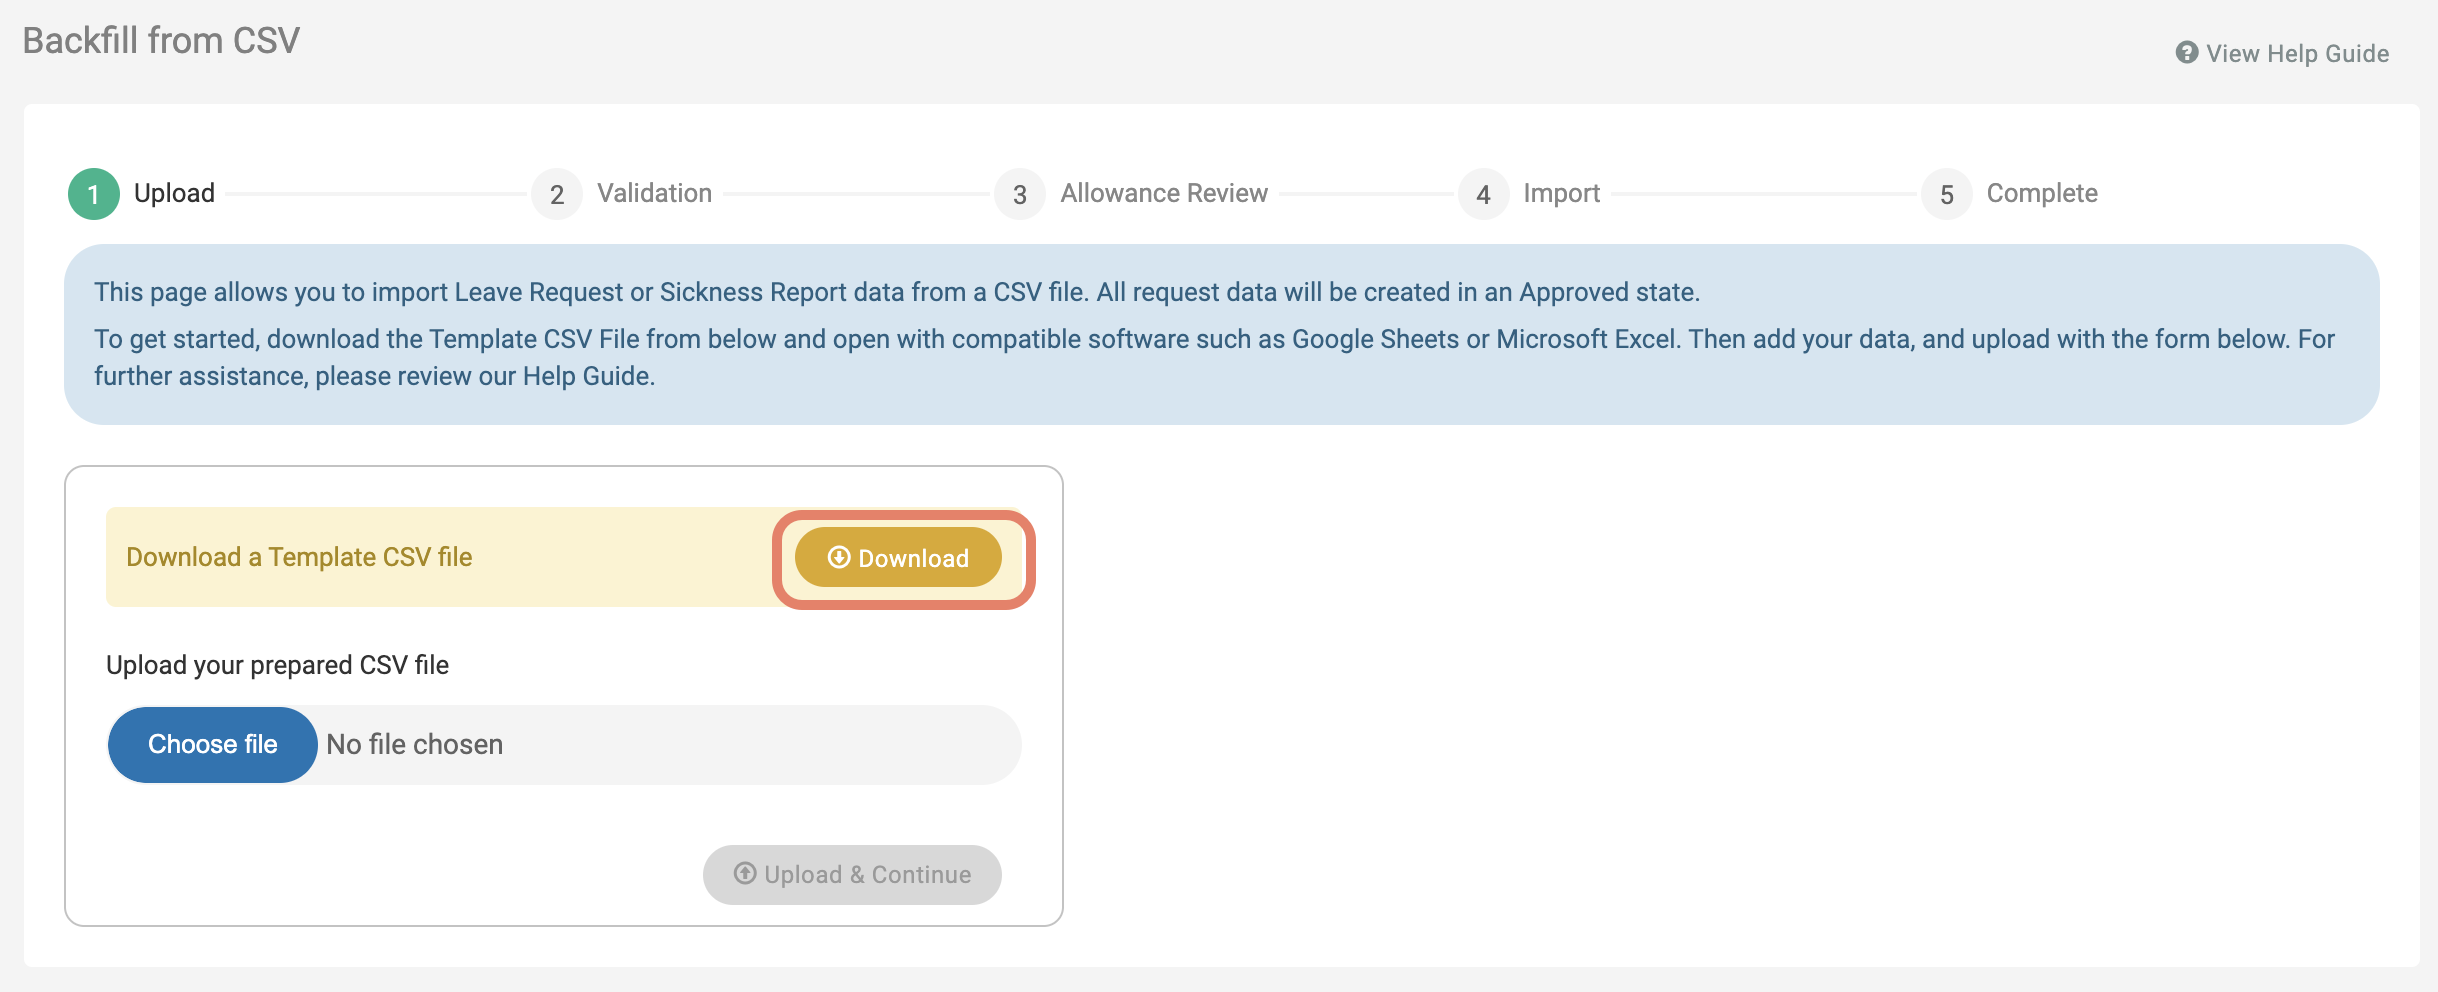
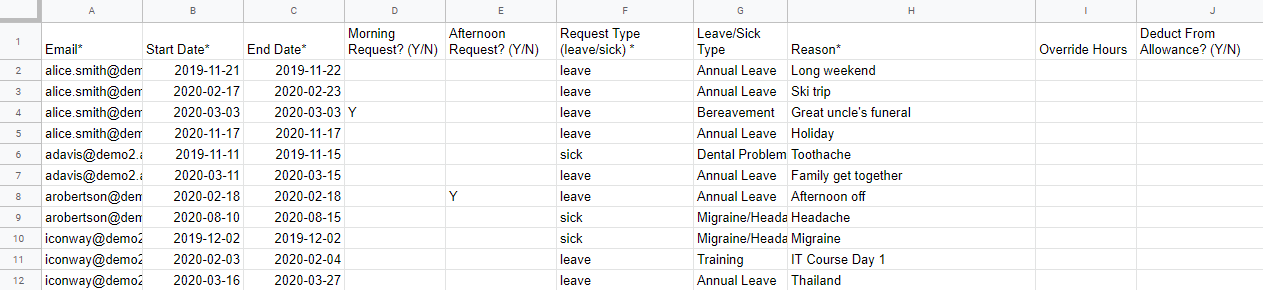
Open the file in your spreadsheet software and fill in out the template as follows, mandatory fields are marked with an asterisk:
Email* - add the employees email addresses as they are within the Cintra People HR system (you can export a list of these by going to Leave Reporting > Data Export and selecting 'Employees' from the Data set).
Start Date* - add the start date of the request
End Date* - add the end date of the request
Morning Request? - Y/N if the request is morning only (half day)
For requests which are longer than a day, you can also add a Y here to mark the last day of the request as a half day
Afternoon Request? - Y/N if the request is afternoon only (half day)
For requests which are longer than a day, you can also add a Y here to mark the first day of the request as a half day
Request Type - leave or sick (ensure this is lower case)
Leave/Sick Type - as defined in your Leave and Sickness Types (Process Config > Leave Types/Sickness Types). e.g. Annual Leave/Maternity Leave etc
Reason - Add a reason for the Leave/Sick request
Override hours - if you want to override the computed hours for the request, enter the number of hours here. For example, a medical appointment for 2 hours, add '2'. Leave blank to use the pre-configured working hours
Deduct from Allowance? - You can leave this blank and the system will respect the configuration of your Leave/Sickness types as per the settings (Process Config > Leave Types/Sickness Types). To override whether the request deducts or not, add a Y or N as appropriate
When filled out, your file will look something like this:
Save the file as .csv and then upload using the browse button. Click Upload & Continue.
The system will then validate the upload and identify any errors, for example if a user does not exist, or if there is a request already on the days you have added.
You will need to fix the errors in the sheet first, and then reupload.
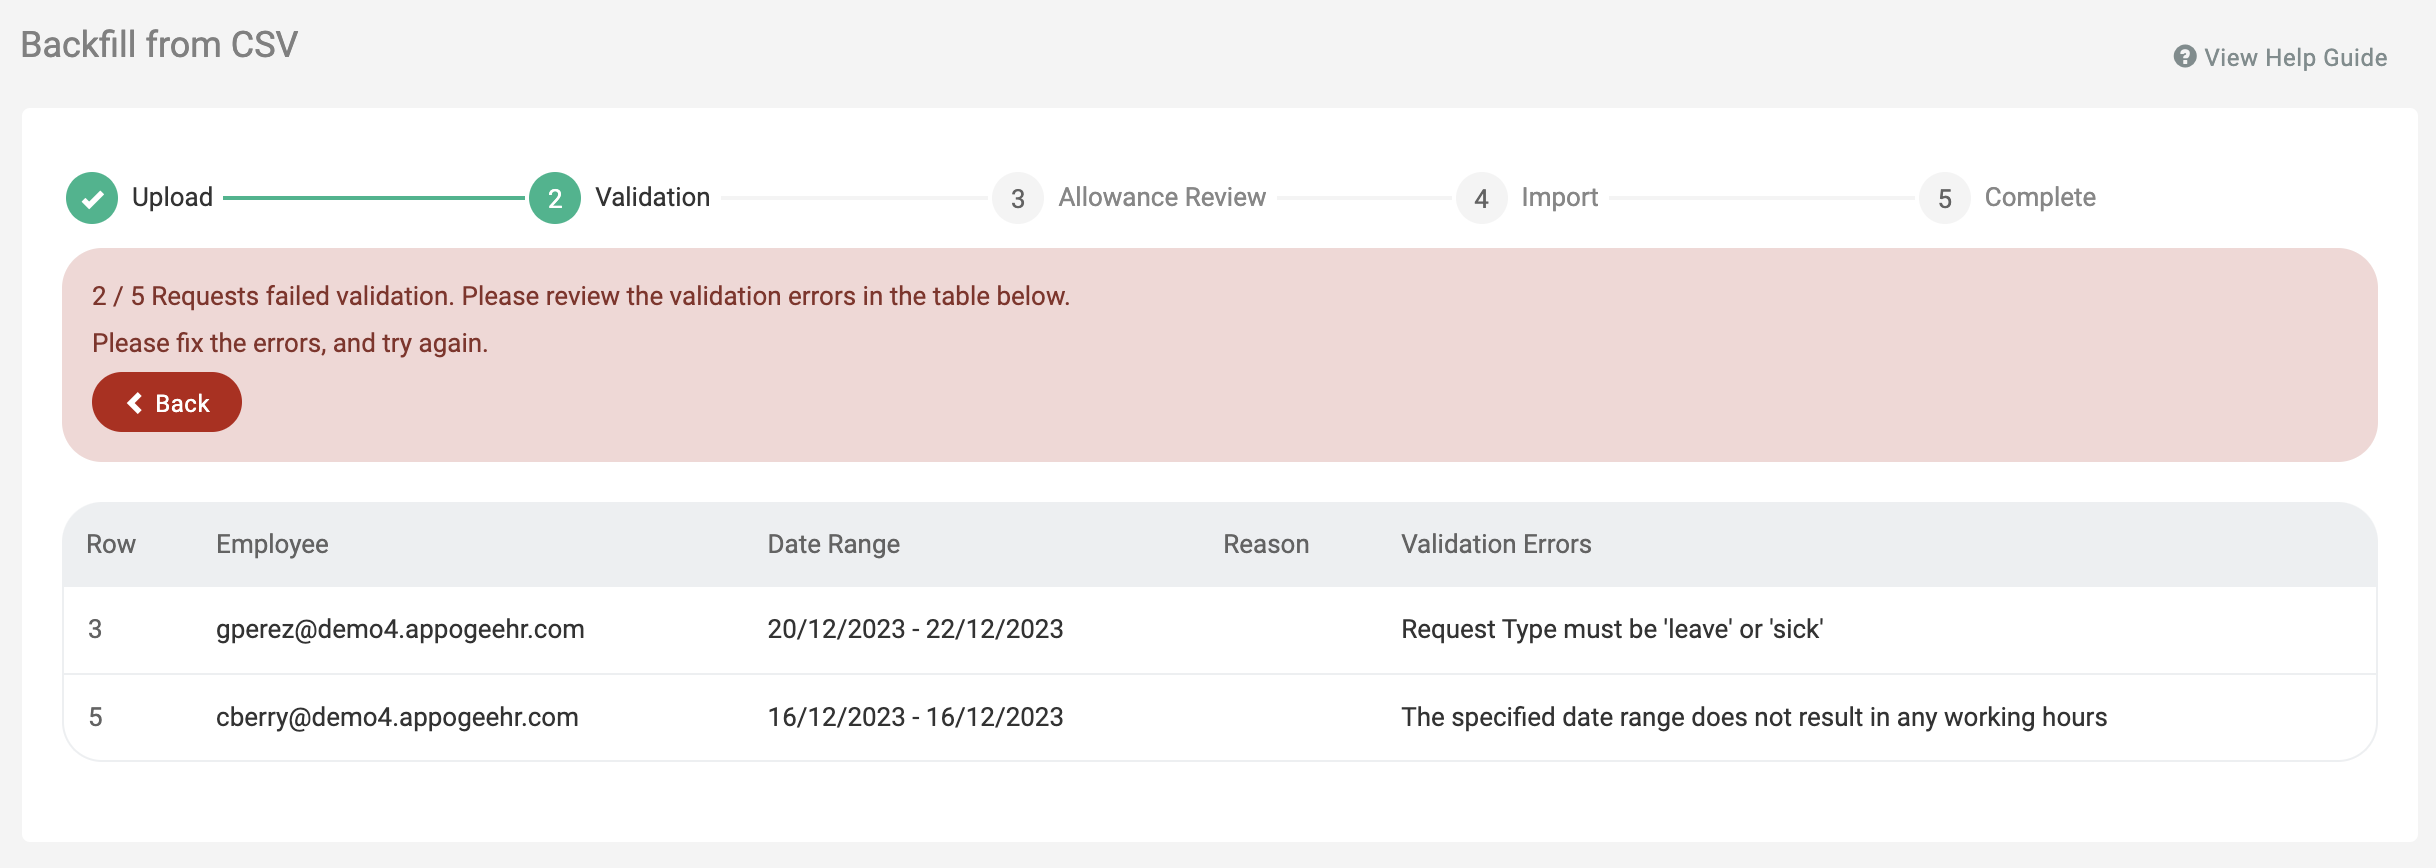
You will be able to see what the errors are by checking the note in the 'Validation Errors' column. Common errors include:
Troubleshooting
Allowance not found for the Request period
Check the Active Leave Years and Leave Year Start Month under System Config, Leave to ensure they cover the period of the records you are importing.
Category contains invalid data
The leave or sick type you are importing does not exist under Process Config, Leave Types. Add them and retry the import.
Request is clashing with another request in the csv file [Row:n]
Dates of the requests you are importing overlap with either the dates flagged in the specified row. Note that the row number specified excludes the header row.
Override Hours contains invalid data
This must be a numeric value.
The specified date range does not result in any working hours
For example this could be due to weekends, public holidays or a specific working rote for the leave profile.
Validation errors
When using the Backfill from CSV tool, the system validates the information in the CSV sheet that you are uploading. Sometimes your data will fail validation, below is a list of the validation checks and what you can do to resolve them.
Error Message | Action |
Employee with email address {email} could not be found | There is no employee in the system with that email address - change the CSV or add an employee with this email address |
Employee with email address {email} is Inactive | The use with this email address is former or archived - change the employee's end date or restore their account from archive to active |
Start Date must be on or before End Date | Change the start date in the CSV |
Morning contains invalid data | Change the CSV to one of the following: 'TRUE', 'YES', 'ON', 'T', 'Y', '1', 'FALSE', 'NO', 'OFF', 'F', 'N', '0' |
Afternoon contains invalid data | Change the CSV to one of the following: 'TRUE', 'YES', 'ON', 'T', 'Y', '1', 'FALSE', 'NO', 'OFF', 'F', 'N', '0' |
For one day requests, Morning and Afternoon cannot both be True | If the request is one day, remove the data from both Morning and Afternoon columns |
Override Hours contains invalid data | Change the CSV so the data in this field is a number |
Deduct From Allowance contains invalid data | Change the CSV so the data in this field is a number |
Deduct From Allowance should not be provided for Sickness Reports | Sickness reports do not need to be deductible |
Request clashes with another request in the CSV file on row {row} | Change the dates of one of the requests |
Request clashes with another request in the system | Change the dates of this requests |
Allowance not found for the Request period | Check that the employee has an allowance. |
Request cannot span a leave year | The last day of the request must be the last day of the leave year - split the leave request into two |
Request Type must be 'leave' or 'sick' | Change the CSV to 'leave' or 'sick' |
Leave / Sick Type '{field}' could not be found | Change the Leave/Sick Type to one that has been configured in Process Config |
Leave/Sick Type Not Provided | Provide a Leave/Sick type in this field on the CSV |
The specified date range does not result in any working hours | The request has been input across non-working days, e.g. a weekend. Check the employee's Working Rota (Leave Profile) and update the CSV |
After a success upload
Once you have made the necessary changes to the spreadsheet, re-save it as a .csv file and then upload again.
Once you have a successful upload, you will be shown the Allowance Review page. It is important to check allowances here, because the upload will still continue even if the employee's allowance will be reduced below zero.
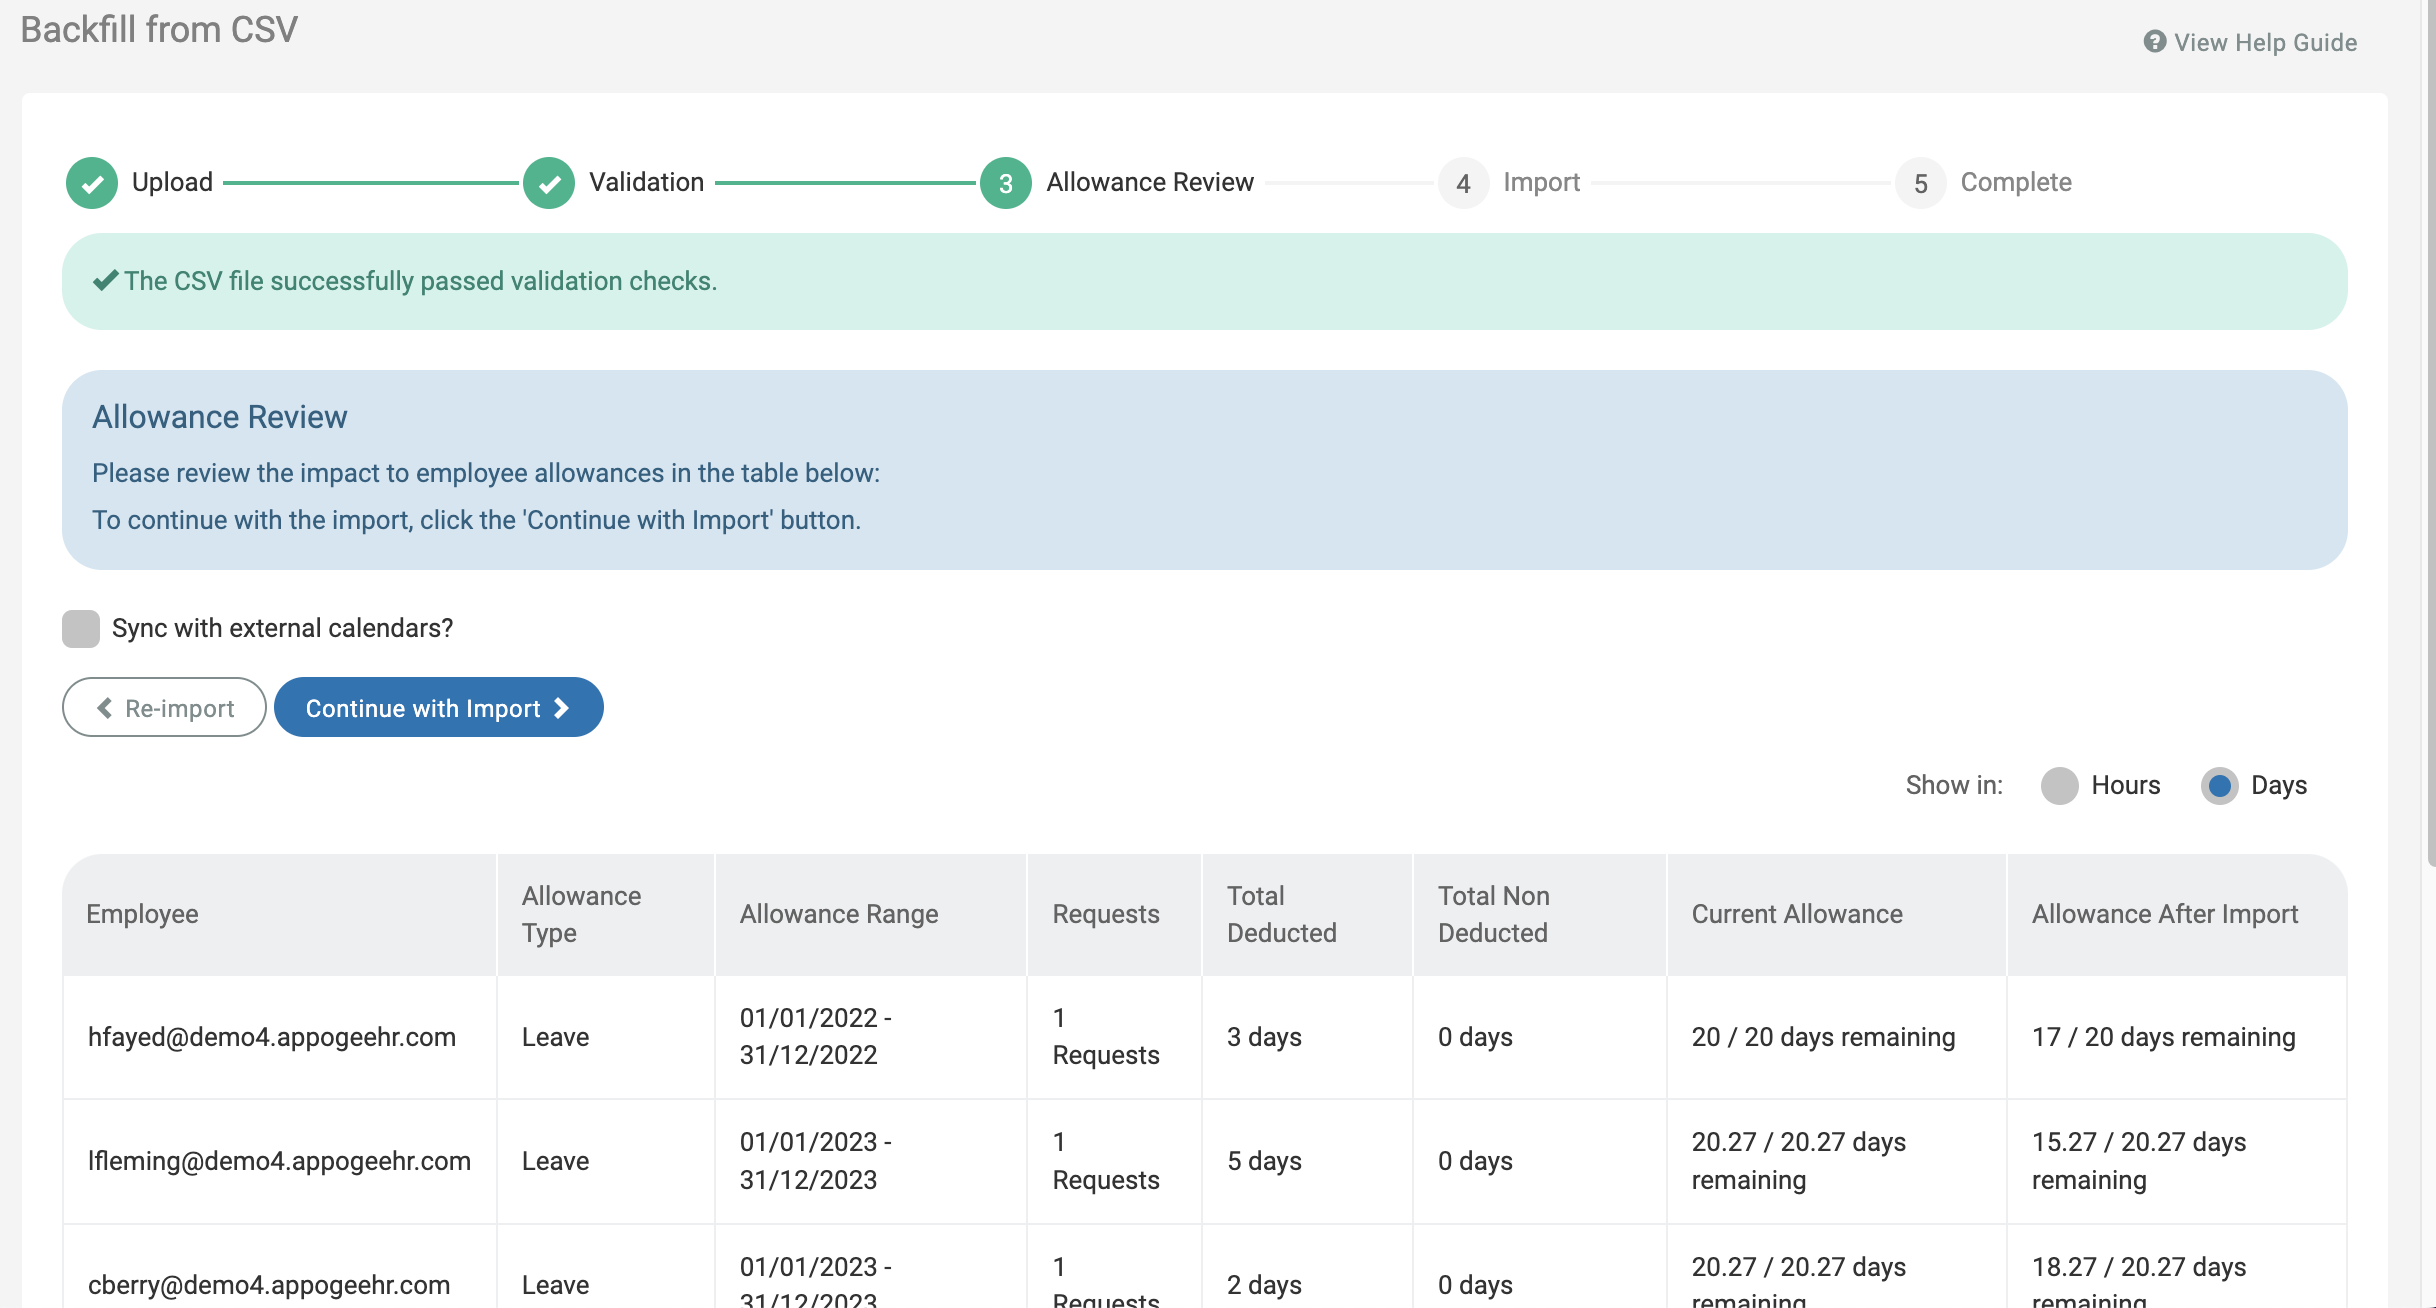
If the import means an employee's allowance is due to go below the zero, it will show in red rather than black.

When you're happy with the upload, click Continue with Import.
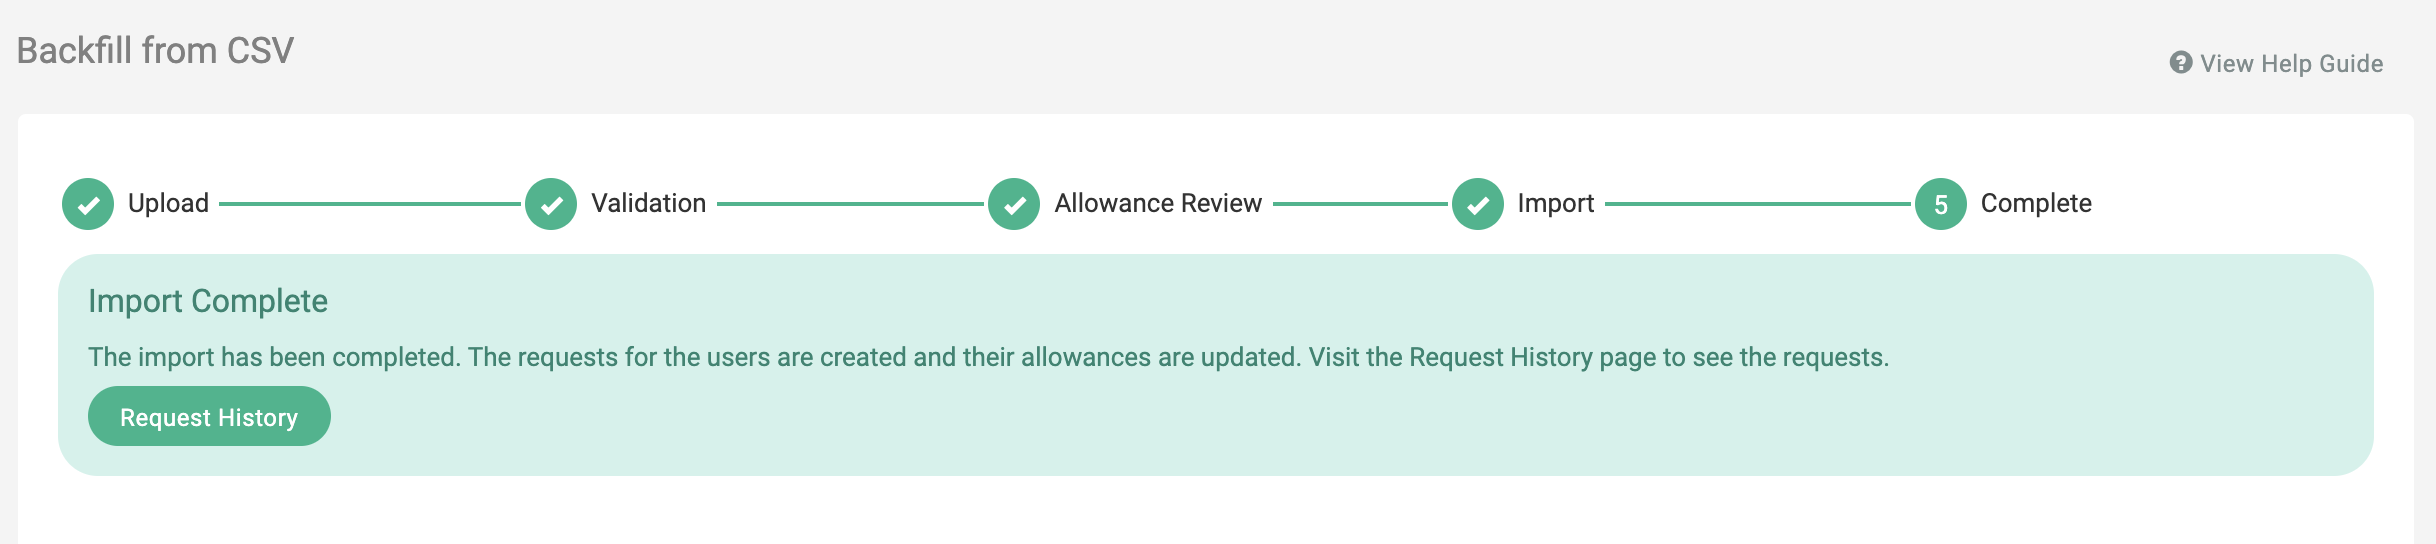
Once complete, you will be able to go to the request history page.