Cintra sets up the HiBob integration with your HiBob admin. Your HiBob admin creates a few things in HiBob and sends the details to Cintra, then Cintra creates the integration. Once it's in place, your payroll user runs the first sync.
Before you start, make sure your payrolls, work patterns, headings, pension scheme parts and cost codes have the same names in HiBob and payroll. See HiBob integration: Overview.
Setup at a glance
Step | Who does it? |
|---|---|
Create a service user | HiBob admin |
Create a permission group and assign the service user to it | HiBob admin |
Create the custom fields | HiBob admin |
Create the company sick pay report | HiBob admin |
Send the details to Cintra | HiBob admin |
Create the integration and map your data | Cintra |
Run the first sync and check the results | Payroll user |
Creating a service user
The integration uses a HiBob service user to read your data.
In HiBob, go to System Settings > Integration tools > Service users.
Click Create service user.
Enter a display name and, if you want, a description, then click Create.
Copy the Service user ID and token, and keep them somewhere safe.
HiBob only shows the token once, so make sure you save it before you move on.
For more information, see HiBob's help article Manage service users.
Creating a permission group
In HiBob, navigate to Permission groups within Account. (System Settings>Account>Permission groups).
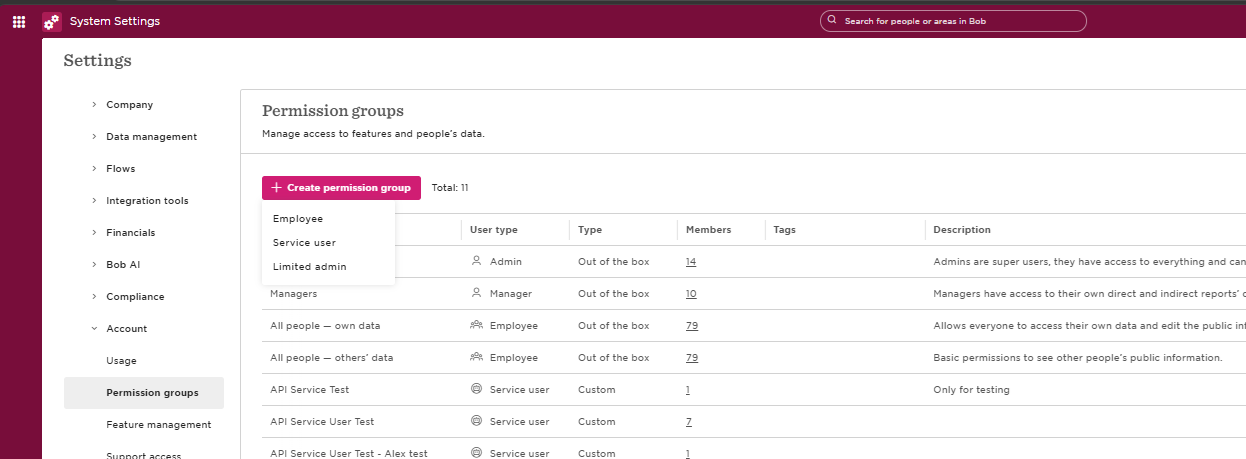
Create a server user permission group just for the integration, and give it the permissions listed in the tables below.
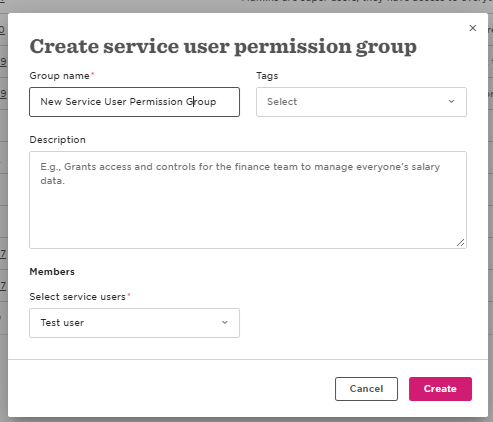
Assign the service user to the permission group.
Make sure the service user can read the Cintra payroll name custom field in the Payroll section.
In Access data for, remove the Lifecycle status = Employed condition, otherwise, leavers won't sync.
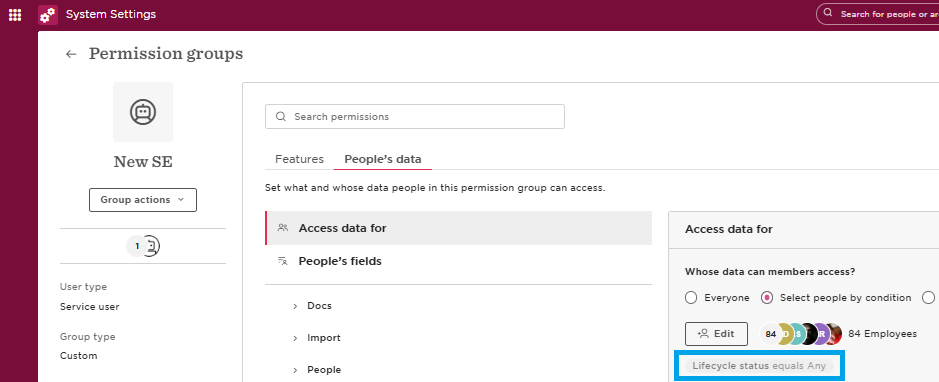
Features tab permissions
Data category | Permission required |
|---|---|
Advanced analytics > Lifecycle | View the aggregate of everyone's Lifecycle data |
People > ATS Pending Hires | View Pending Hires for ATS integrations |
People > Club View | View the company's clubs view |
People > Directory | View the company's people directory |
Settings > Working Patterns | Manage working patterns |
Time off > Settings | See company's time off settings |
Features > Reports | View reports according to people's data access rights |
People's data tab permissions
Data category | Permission required |
|---|---|
People > About | View selected employees' About section histories |
People > Address | View selected employees' Address section histories |
People > Basic info | View selected employees' Basic info section histories |
People > Employment | View selected employees' Employment section histories |
People > Financial | View selected employees' Financial section histories |
People > Home | View selected employees' Home section histories |
People > Identification | Edit selected employees' Identification sections |
People > Lifecycle | View selected employees' Lifecycle section histories |
People > Payroll | View selected employees' Payroll section histories |
People > Personal | Edit selected employees' Personal sections |
People > Personal contact details | View selected employees' Personal contact details section histories |
People > UK tax settings | View selected employees' UK tax settings section histories |
People > User data | View selected employees' User data section histories |
People > Work | View selected employees' Work section histories |
People > Work contact details | View selected employees' Work contact details section histories |
People > Pensions | View selected employees' Pensions section histories |
Time off > Balance | Adjust selected people's time off balances and bank their overtime |
Time off > Requests | View all fields, approve or decline requests that are pending approval of others |
Time off > See who's out today | See who's out based on their personal working pattern and time off calendar |
Creating the custom fields
HiBob doesn't hold some payroll data as standard, so you need to create custom fields for it. These include the Cintra payroll name, sort code and pension details, plus some optional fields depending on how you pay your employees. See HiBob integration: Required fields in HiBob.
Creating the company sick pay report
The integration uses a HiBob report to find out which sick pay policy each employee is on.
In HiBob, go to Analytics > Reports > Time Off > Policy Assignments Summary.
Duplicate the report, so you have a copy just for the integration. If the report isn't there, create a custom report using the time off policy assignment fields.
Make sure the report includes at least the employee ID or name, policy type, policy name, assignment effective date and assignment status.
Filter the report to show only the sick leave policy type.
Set the date range to Last 365 days.
Make a note of the report ID. You'll find it in the report's URL, for example
31324507.
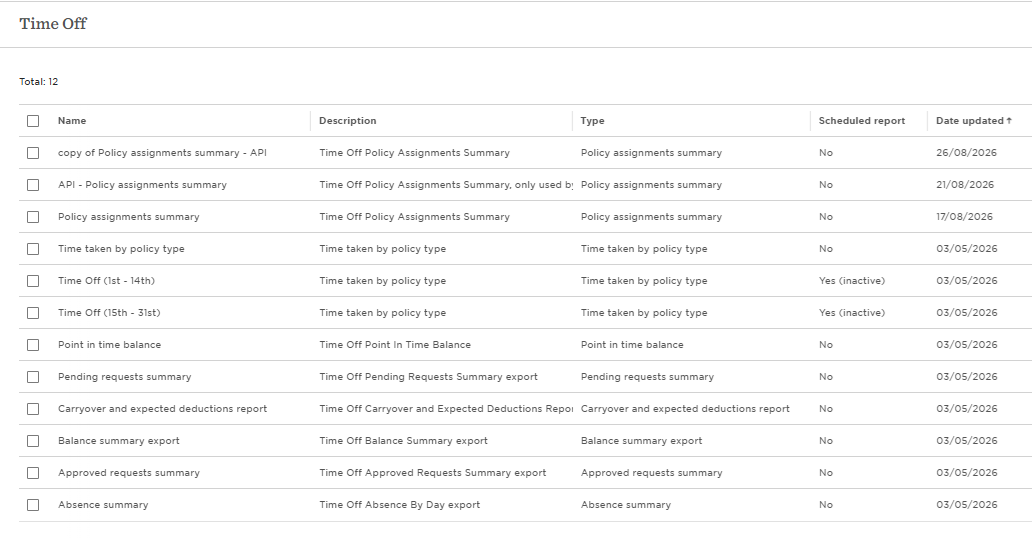
Every employee must have a sick leave policy assigned in HiBob. If an employee doesn't have one, none of their absences come into payroll. If your company doesn't have a company sick pay policy, assign a statutory sick pay policy instead.
Sending the details to Cintra
Send Cintra:
The service user ID and token
The company sick pay report ID
A list of the absence types (policy types) you use in HiBob
You should send these details either via the support ticket or though Cintra People messaging.
What Cintra does
Cintra then:
Enters the API credentials and creates the integration
Applies your company sick pay report ID
Maps your absence types and any custom fields, such as roll number, cost parts, units and rate
Cintra lets you know when the integration is ready for the first sync.
Running the first sync
Once the integration is ready, your payroll user runs the first sync and checks the results.
Go to Payroll > CintraHR log and click Sync now.
For each employee, check that these have synced correctly:
Name
Address
National Insurance number
Salary
Work pattern
Bank details
Fix any errors in HiBob or payroll, depending on the error, then run the sync again.
Note: Any changes made in Payroll will NOT be updated in Hibob. Only make payroll changes if it relates to a configuration and NOT an employee record. For example:
You can update work pattern name in Payroll.
You should NOT change an employee's bank account details in Payroll.
While you're testing, work through a small group of employees at a time. This makes it easier to trace each error back to a specific change.
To see everything the sync has changed in the current period, use the payroll's period changes view. See Viewing period changes.
For help with errors, see HiBob integration: Using the CintraHR log.