This article covers common problems with NEST pension submissions in Cintra People, the errors you may see, and how to fix them.
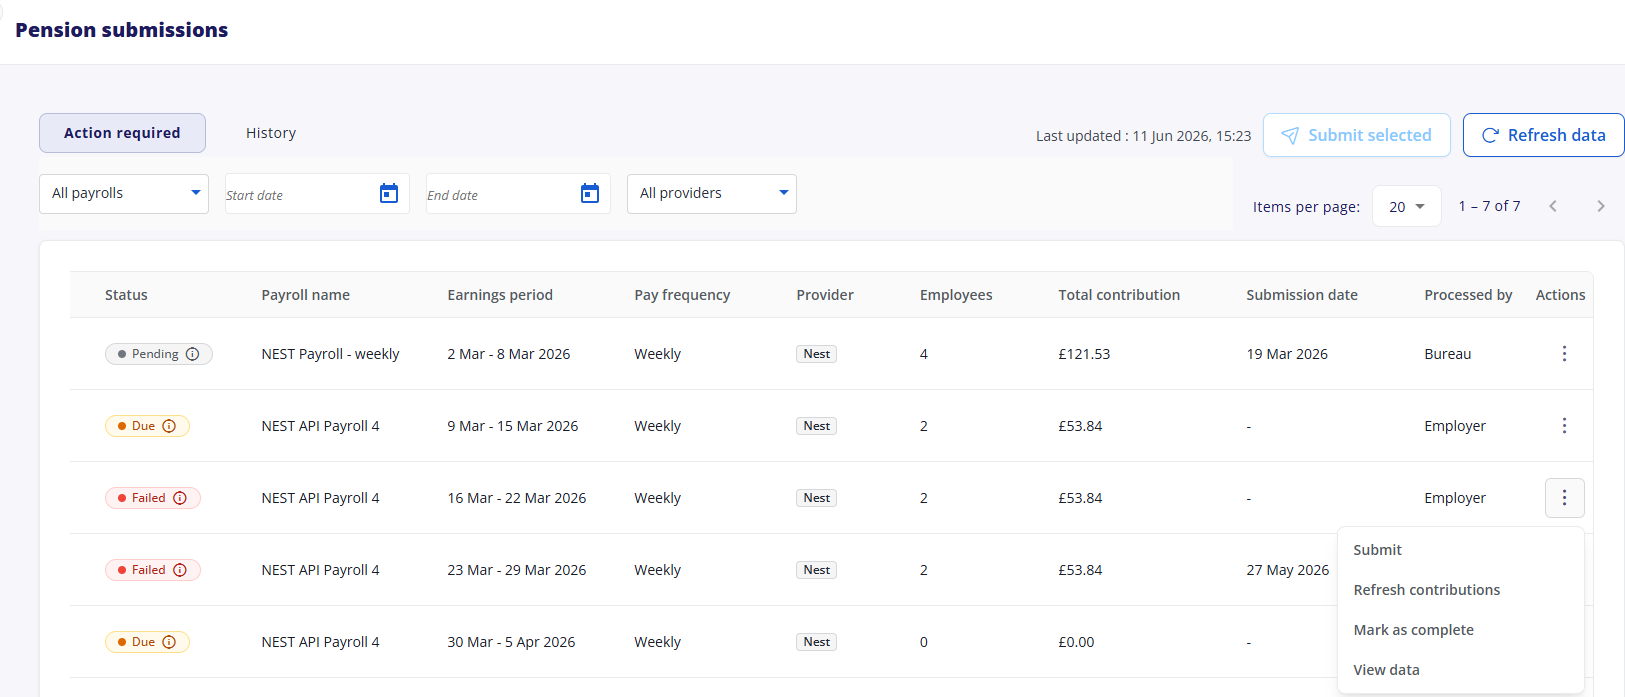
To identify the cause of a failed submission, go to Actions > View data and check the error shown.
Note: Source customers do not have access to Cintra iQ. If you are a Source customer and have a configuration issue, escalate it to your OSS bureau team.
Dashboard and setup
A payroll is not showing on the Pension submissions dashboard
Check the following:
Pension submission is enabled for the payroll (Bureau > Organisations > Pension submission settings, or Payroll > Settings > Manage payrolls).
The start date is on or before the period you want to submit.
No end date is set, unless you intentionally stopped submissions for that payroll.
The period has been rolled forward in Cintra iQ.
Select Refresh data on the Payroll tab if the payroll was enabled for NEST submission after the roll forward.
Check the History tab, as the period may already have been submitted.
Submission errors
Error: You must provide a valid header or trailer record
This means there is a mismatch between what Cintra iQ is sending and what NEST expects, usually in the payment source, frequency, or payment due date format.
Check the following in Cintra iQ, then resubmit:
Payment source and frequency.
Payment due date format (it must match an existing contribution schedule on NEST).
Earnings period and pay date.
For the detailed steps to correct each of these, see Fixing Cintra iQ setup issues below.
Once you have applied the fix in Cintra iQ, select Refresh contributions from the Actions menu before resubmitting.
If you are a Source customer, raise the Cintra iQ change with your OSS bureau team.
Error: Payment source element is mandatory
The payment source is missing or incorrect in Cintra iQ. See Incorrect payment source below.
Error: Automatic payment approval is only available for Direct Debit
A Direct Debit mandate has not been set up, or has not yet been processed. Cintra People supports Direct Debit only. Debit card and Direct Credit are not supported.
Only an employer can set up a Direct Debit mandate in NEST. Allow up to 5 working days for it to be activated. Until then, the employer must log in to NEST to authorise payments manually.
For more information, see Setting up Direct Debit | NEST pensions.
Error: No data is available for the period requested
This appears when a submission has a status of Due with a total contribution of £0.00, and you select Refresh contributions from the Actions menu.

To fix this:
Check whether the contribution schedule is present in NEST. The schedule may not have been calculated yet because no employees have been enrolled.
If no employees are enrolled, upload the enrolment data manually. Once the schedule is generated, you can submit the contributions via the API.
Missing contributions tab, or contribution total shows zero before submission
This symptom has three possible causes:
Cause 1: a mismatch between Cintra iQ and NEST. Work through the checks in Fixing Cintra iQ setup issues below, then select Refresh contributions and resubmit.
Cause 2: no contribution schedule exists in NEST yet. If the schedule has not been calculated in NEST (often because no employees are enrolled), you cannot submit any data. Upload the enrolment data manually, then select Refresh contributions once the schedule is due on NEST.
Cause 3: Your NEST account doesn’t have the required delegate authorisation to submit for this organisation. Log into NEST and check whether the relevant organisation is visible in your account.
Enrolment errors
Error: Pension group missing for an employee
If you have more than one pension group set up in NEST, you must assign each employee to the correct pension group in Cintra iQ when you enrol them.
If the pension group already exists, assign it at employee level:
Open the employee's Employment record.
Go to Expenses/Benefits.
In the Pensions & Benefits Schemes tab, select the appropriate Pension Pay Group from the dropdown.
If a new pension group is needed:
Select Definitions from the top menu bar.
Select Lookups.
In the Lookup Administration window, search for Pension Groups in the Lookup Table dropdown.
Select Insert to create a new pension group.
Enter the pension group name exactly as it appears in NEST (case sensitive).
To check the naming convention, go to NEST, find your employer, then Manage groups.
Contribution errors
Error: Contributions already submitted for this member
This is a duplicate submission. Log in to NEST to verify that the employee's NI number or alternative ID is not matched to another member record.
Error: Contributions below minimum for pension group
The employee may be assigned to the wrong contribution group, or the minimum contribution threshold is not being met. Check the pension group assignment in NEST and in iQ (the employee's Employment record > Expenses/Benefits > Pension Pay Group).
Error: Contribution values appear doubled on Pension Submission Dashboard
This can happen when NEST is generating two contribution schedules for a single payroll period instead of one.
On NEST, check Manage Contribution Schedules for the payroll period in question. If contribution values look doubled, you will likely see two schedules generated for the same period.
This usually happens because the pension groups involved have mismatched setup on NEST: either the pay date or the earnings period differs between the groups.
Identify which pension group setup is correct. If you still need a separate pension group (for example, for a salary sacrifice pension scheme), copy this group and update the contribution levels, ensuring the pay date and earnings period are already correct.
Transfer workers: NEST > Manage Workers > select employees > Change group > select the matching pension group and today's date > Move.
Once both pension groups share the same setup, NEST will generate a single contribution schedule going forward.
Warning: Contribution schedules may already exist under the old (mismatched) setup and will need clearing. To clear a schedule that's no longer needed, mark one member as Insufficient Earnings on that schedule. When submitting, select Mark all members not yet validated with insufficient earnings.
This is a one-off task that clears the old schedule for the remaining workers.
For more information, see How to add a new group | NEST pensions.
Payment errors
Error: No active Direct Debit mandate
Direct Debit has not been set up, or has not yet been processed. The employer must set up a Direct Debit mandate in NEST and allow up to 5 working days. Until then, payments cannot be authorised through Cintra People.
Debit card and Direct Credit are not supported.
NEST account
The NEST account is locked
NEST locks an account after 3 failed login attempts. This cannot be resolved in Cintra People. You will receive an email from NEST with an unlock code. Use the Unlock my account link on the NEST login page. If this does not resolve it, contact the NEST contact centre directly.
Fixing Cintra iQ setup issues
These fixes apply to customers who have access to Cintra iQ. Source customers should escalate iQ configuration issues to their OSS bureau team.
Incorrect payment due date
Solution A: update the provider pay date
Go to Payroll > Payroll Setup > Third Party Association.
Locate NEST under Pension Scheme Providers, then open the Payment Settings tab.
Select the correct day of the month, and ensure it is set to the following month.
Select the Static option if the pay date falls on a UK non-banking day.
To verify the expected date, go to NEST, find the employer, then Manage contributions and check the Payment due date column.
Solution B: change the payment due date calculation basis
Use this if Solution A does not resolve the problem.
Go to Payroll > Payroll Setup > Employer Setup.
Open the employer record, go to the PAYE & Payrolls tab, then open the payroll record.
Change Pension Output Payment Due Date based on to one of the following:
Option | When to use |
|---|---|
Pay Period End Date | Uses the last day of the payroll period as the reference |
Paydate | Uses the actual employee pay date as the reference |
Pay Reference Period End Date | Uses the last day of the calendar month in which the pay date falls. As above, but retained for payrolls where previously configured |
Custom Period End Date | Uses the end of a custom pension output period. Only available if Custom Period is selected in the Pension Output Period field. Use when the provider uses a non-standard period, for example tax months (6th to 5th) |
Incorrect period dates
Go to Payroll > Payroll Setup > Employer Setup
Open the employer record, go to the PAYE & Payrolls tab, then open the payroll record
Change Pension Output Period based on to Pay Reference Period, Pay Period, or Custom Period
To verify, go to NEST, find the employer, then Manage contributions and check the Earnings period column.
Incorrect payment source
The payment source in the NEST file does not match the NEST portal.
Go to Payroll > Payroll Setup > Employer Setup
Open the employer record, go to the AE Settings & Information tab, then open Pension Scheme Reference
Update the Payment Source field to match the NEST portal value exactly
To verify, go to NEST, find the employer, then Manage contributions and check the Payment source column.
Incorrect NEST reference
The employer NEST reference number (EMP) is wrong.
Go to Payroll > Payroll Setup > Employer Setup.
Open the employer record, go to the AE Settings & Information tab, then open Pension Scheme Reference.
Correct the Reference field so it matches the NEST portal exactly.
To verify, go to NEST and find the employer. The NEST employer ID is shown on the main screen.
Incorrect or missing pension group
Employees are not assigned to the correct pension group, or the group does not exist in iQ.
To assign an employee to a pension group:
Open the employee's Employment record, then go to Expenses/Benefits.
Select the correct Pension Pay Group from the dropdown.
Note: If the correct group rules are unclear, check with the customer before assigning.
To create a new pension group in iQ:
Select Definitions from the top menu, then Lookups.
Search for Pension Groups in Lookup Administration.
Select Insert, then enter the group name exactly as it appears in NEST (case sensitive).
To verify the group name, go to NEST, find the employer, then Manage groups.
Zero contributions
The total contributions show as zero, and the contribution tab is missing under View data.
Check whether the relevant contribution schedule is present in NEST. If the schedule is not on NEST, you cannot submit any data.
If you make any updates in NEST, select Refresh contributions from the Actions menu to retrieve the values once the contribution schedule is due on NEST.
NEST configuration issues you must resolve in NEST
These issues cannot be fixed in Cintra iQ. You must make the changes in your NEST account.
Earnings period starting on the 31st
Some NEST accounts have earnings periods starting on the 31st of the previous month (for example 31/12/2025 to 30/01/2026 instead of 01/01/2026 to 31/01/2026). Cintra iQ does not support this.
Create a new pension group in NEST by copying an existing group, rather than starting from scratch.
In the When is your current earnings period due to end section, set the value to 31st.
Transfer workers: NEST > Manage Workers > select employees > Change group > select the new group and today's date > Move.
Warning: Two contribution schedules may appear for the same period. To clear the old one, mark one member with Insufficient Earnings and submit £0.00. On the payment screen, select Mark all members not yet validated with insufficient earnings. This is a one-off task.
For more information, see How to add a new group | NEST pensions.
Payment frequency set to Tax Monthly or Tax Weekly
NEST supports Tax Monthly and Tax Weekly, but Cintra iQ does not.
Create a new pension group in NEST by copying an existing group.
In Payment frequency, select Monthly, Weekly, Four weekly, or Fortnightly. Do not select Tax Monthly or Tax Weekly.
Transfer workers: NEST > Manage Workers > select employees > Change group > select the new group and today's date > Move.
Warning: Two contribution schedules may appear for the same period. To clear the old one, mark one member with Insufficient Earnings and submit £0.00. On the payment screen, select Mark all members not yet validated with insufficient earnings. This is a one-off task.
For more information, see How to add a new group | NEST pensions.
Pay date set as a number of days after the period ends
For non-monthly payrolls (for example weekly), NEST calculates a different pay date each period. Cintra iQ cannot accommodate a variable pay date.
Discuss the appropriate fixed pay date with the customer before making changes, as it may affect their cash flow.
Create a new pension group in NEST by copying an existing group.
In Payment due date, select a specific day of the following month (for example the 10th).
Transfer workers: NEST > Manage Workers > select employees > Change group > select the new group and today's date > Move.
Warning: Two contribution schedules may appear for the same period. To clear the old one, mark one member with Insufficient Earnings and submit £0.00. On the payment screen, select Mark all members not yet validated with insufficient earnings. This is a one-off task.
For more information, see How to add a new group | NEST pensions.
Payment authorisation
Cintra People completes the full end-to-end process, including payment, for the Direct Debit method only.
The customer must submit directly through Cintra People, including payment authorisation.
Note: Debit card payments are not supported. If the customer pays by debit card, they must set up a Direct Debit first. Direct them to Setting up Direct Debit | NEST pensions.
Your organisation has multiple NEST credentials
If you are a delegate under every scheme, you can set yourself up as a NEST Connector and access all your schemes under one login for API submission. For more information, see Set up NEST Connect | NEST pensions.
Limitations
Limitation | Detail |
|---|---|
Direct Debit only | Debit card and Direct Credit are not supported. Customers must use Direct Debit |
NEST only | People's Pension API integration is not yet available |
Monthly pay date only | Regardless of the periodicity of the payroll, the payment date for NEST can only be once a month |