The Statutory Deductions tab lets you view and manage all the information relating to how much is taken from an employee's pay each period, including tax, National Insurance, student loans, and court orders.
To access statutory deductions, open a payroll, edit the employee, then select the Statutory Deductions tab.

The Court orders tab shows every court order an employee holds: child maintenance, council tax arrears, court fines etc, along with what's been deducted for each one each pay period.
Viewing court orders
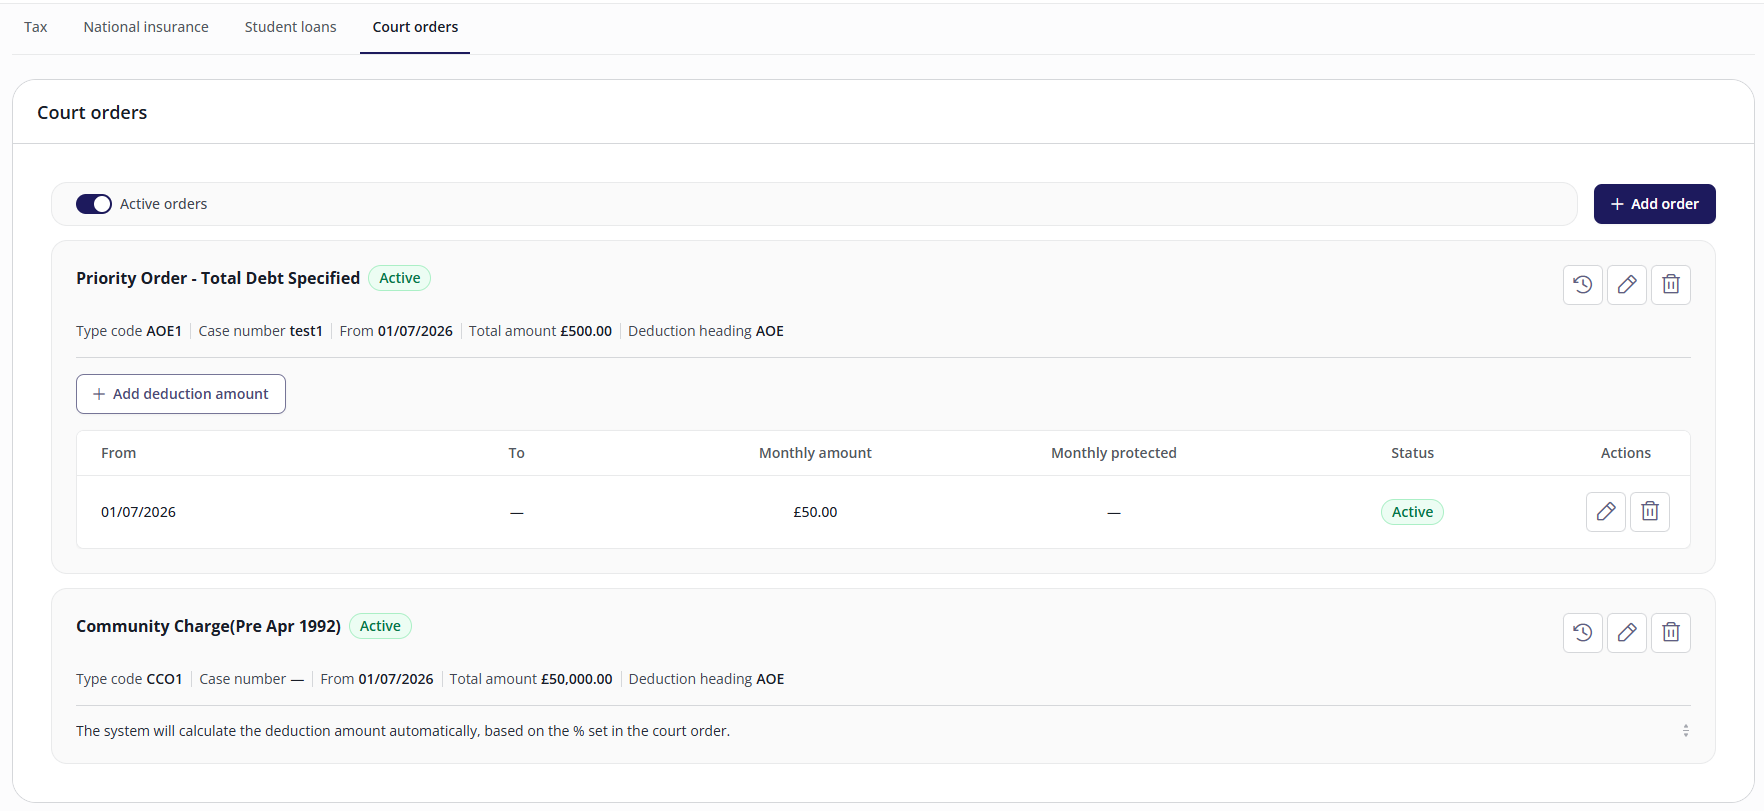
Each order is shown as its own card, with a status: Upcoming, Active, or Inactive, plus its type code, case number, start date, total amount, and deduction heading.
Switch on Active orders to hide finished orders. Switch it off to see the full list, including inactive orders.
Click an order’s history icon  to expand its payment history - the amount actually deducted each pay period, with any corrected period marked Backdated. This is read-only and is available to everyone, regardless of edit access, so that any user can explain a deduction to an employee without needing edit rights.
Managing court orders
Important! Every change you make to a order can trigger a recalculation.
Adding, editing, or deleting an order or a deduction amount flags the employee for payroll recalculation. A change affecting an already-paid period generates a correction on the next run rather than rewriting history. XX - is this correct?
Adding a court order
Click Add order to start the three-step wizard.
Step 1: Type & authority
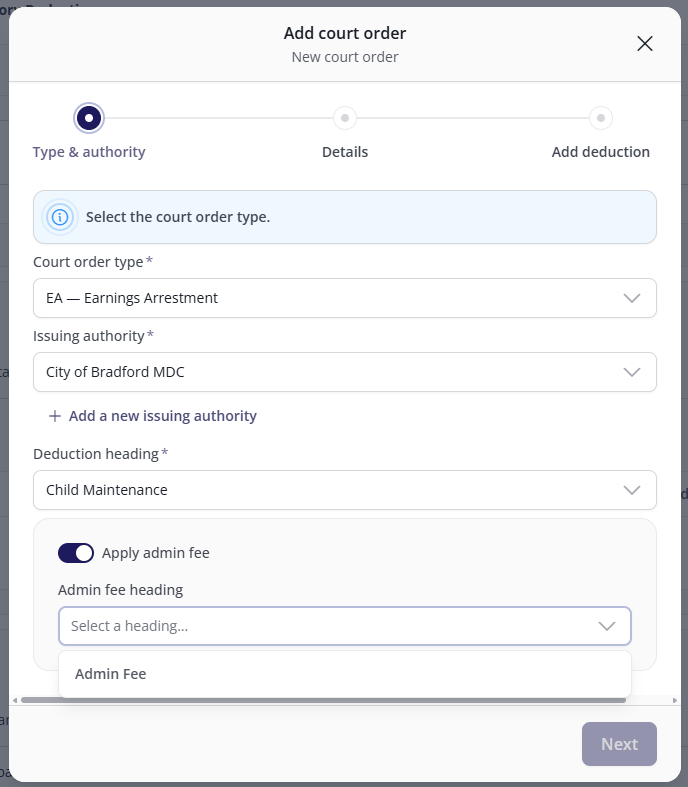
Select the Court order type.
Select the Issuing authority (the body the money is paid to). If the authority isn't listed, see Adding a new issuing authority below.
Select the Deduction heading the deduction posts to.
Optionally, switch on Apply admin fee and select an Admin fee heading.
Click Next.
Student loan orders are never shown in the type list. They're maintained on the separate Student loans tab.
Step 2: Details
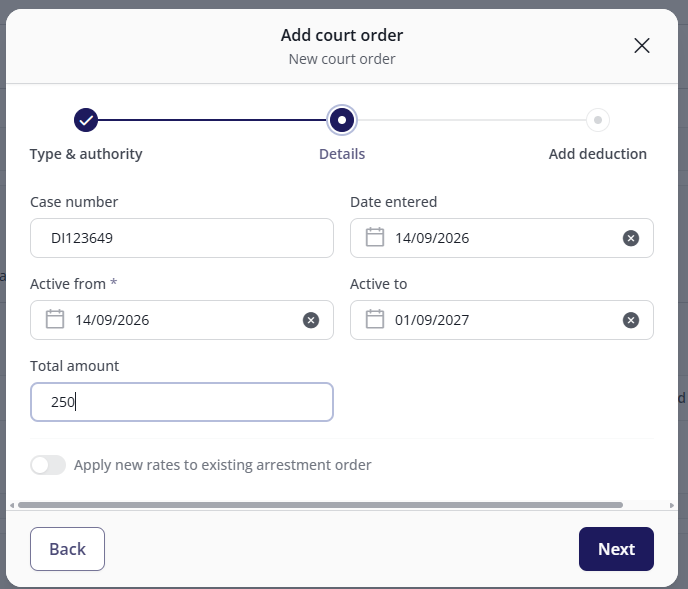
Optionally, enter a Case number (18 characters or fewer).
Enter the Date entered and Active from date.
Optionally, enter an Active to date.
If the order type takes one, enter the Total amount. For types that don't work on a total-amount basis, this field is disabled.
If the order type is CMA or Earnings Arrestment, optionally switch on Apply new rates to existing arrestment order. For every other type, this option is disabled, since it doesn't apply.
Click Next.
Step 3: Add deduction amount
Enter the From date and, optionally, a To date.
If not greyed out (see Order types below), enter the amount fields for that order type.
Click Save.
The order and its first deduction amount are created together in one save.
If you save with a start date that falls in a pay period that may already be closed, you'll see a message explaining the adjustment will be made as a correction in the next payroll run. Click Save again to confirm. Changing either date clears that confirmation and asks again.
Note! You can't backdate a court order into a previous tax year.
Order types
The fields on the deduction amount form depend on the order type you selected in step 1. Not every court order works the same way, so the form only asks for what that type actually needs:
Some types ask for an amount and a protected earnings figure: the normal case. You enter both, for the employee's current pay frequency.
Some types ask for a daily amount only, with no protected earnings figure, because the deduction is calculated as a daily rate rather than per pay period.
Some types ask for protected earnings only, with no deduction amount. The amount itself is worked out from a statutory table, so it's never entered manually.
Some types ask for an amount only, with no protected earnings floor.
Some types don't ask for any amount at all. The screen tells you amounts don't apply, and the deduction is calculated automatically, for example, from a percentage set elsewhere on the order.
Because of this, the total amount field and the Apply new rates to existing arrestment order option also aren't available for every type. If either is disabled, it means the order type you've selected doesn't use it.
Only the employee's current pay frequency is shown on the deduction form, even though the underlying record can hold a value for every pay frequency the system supports.
Adding a new issuing authority
If the authority you need doesn't already exist, you can add one without leaving the wizard.
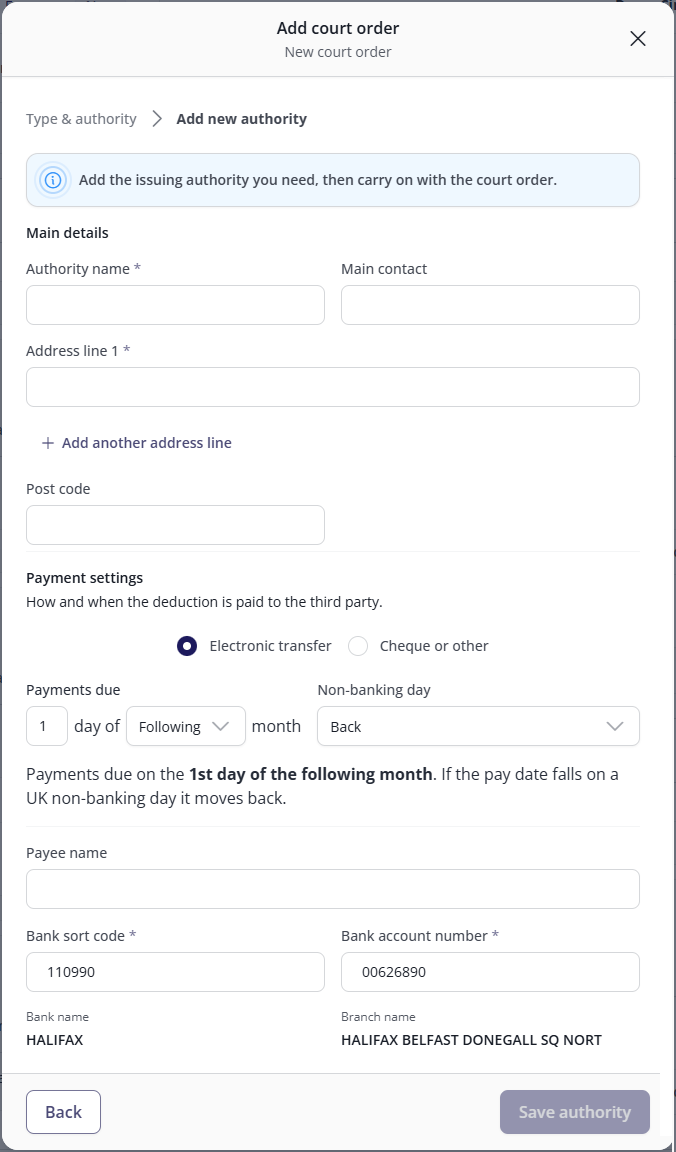
On step 1 of the Add court order wizard, click Add a new issuing authority.
Under Main details, enter the Authority name, Address line 1, and optionally a Main contact. Click Add another address line if you need more than one line.
Optionally, enter a Post code.
Under Payment settings, choose how the deduction is paid to the authority, Electronic transfer or Cheque or other.
Set when payment is due - the day of the month, and whether that's the current or following month - and choose what happens if the pay date falls on a UK non-banking day (Back or forward, depending on what's offered).
If paying electronically, enter the Payee name, Bank sort code, and Bank account number. The bank name and branch name are filled in automatically from the sort code.
Click Save authority.
Saving returns you to step 1 of the Add court order wizard, with the new authority already selected.
Editing a court order
Click the edit icon on an order to change its case number, dates, total amount, admin fee heading, or apply-new-rates setting. The order's type, issuing authority, and deduction heading can't be changed once it's created. If any of these are wrong, delete the order and create a new one instead.
Deleting a court order
Click the delete icon and confirm. Deleting an order is permanent and removes all of its deduction amounts in the same action.
You can't delete a court order once deductions have been taken from it in a previous payroll period. To stop future deductions instead, set an Active to date on the order.
Deduction amounts
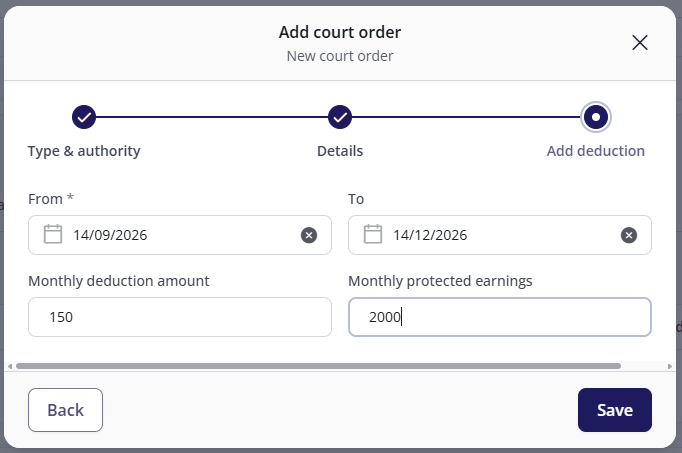
Each order can hold more than one dated deduction amount row, but only one can apply on any given pay date. When a court revises an amount, don't edit the existing row, end it with a To date and add a new row starting the next day, so the order keeps a full history.
Click Add deduction amount to add a new row.
Click the edit icon on a row to change its dates or amount.
Click the delete icon on a row to remove it. This is permanent.
Two deduction amount rows on the same order can't cover the same day..
View-only access (Source payrolls)
If your payroll is supported by a bureau, the Court orders tab is view-only.
FAQs
Why can't I enter a total amount for this court order?
Whether a total amount applies depends on the order type. Some types collect towards a total and stop once it's reached; others calculate the deduction a different way, and the field is disabled.
Why is "Apply new rates to existing arrestment order" greyed out?
This option only applies to CMA and Earnings Arrestment order types. For any other type, it's disabled because it doesn't apply.
Why can't I edit or delete this court order?
Possible reasons include:
You're on a Source / outsourced payroll.
The payroll is currently being processed,
Deductions have already been taken from this order in a previous payroll period (in the case of deletions).
Can I review or override what was actually deducted for one specific pay period?
Not from this screen. Reviewing or overriding a single pay period's deduction still has to be done by your bureau / Cintra iQ.