In general, corrections will occur automatically via an employee's Post History, Sickness event etc. However you can also add corrections directly, or through post history, the calendar, or payments and rates. You can make a correction for the maximum of a two year period.
Ad hoc corrections
An ad hoc correction is a manual, one-off payment or deduction entered directly against a specific past pay period, used when nothing else in the system already generates the correction automatically.
If you need to backdate a manually entered pension deduction to apply basic rate (BR) tax relief correctly, see Manual pension contributions not applying basic rate tax relief.
Creating an ad hoc payment correction for a previous period
Step 1 - Set up the period
Navigate to the Payments and Rates tab on the employee's Payroll Period Input and Corrections form.
Go to Cintra iQ: Employment record > Forms > Payroll Period Input
Select the Payroll Period for the month you wish to make a correction.
If no correction has been made, the Period Input tabs are greyed-out.
Click the Create Input Correction button.
Note: A list of correction periods only appears if previous corrections were made.
Click the Create button. The Create Correction form appears.
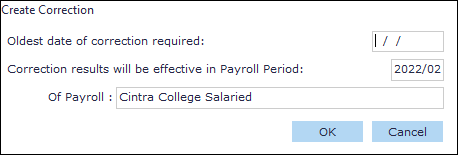
Enter the Oldest date of correction required.
This date is used to generate the required input forms for the periods to which you want to apply corrections.
Click the OK button. A message appears stating the Correction is created and the correction periods are added to the Create/Delete Corrections Periods form for reference purposes only.
Click the Cancel button to exit. You are returned to the employee's Payments and Rates tab of the Payroll Period Input and Corrections form.
Toggle between the Show Original Period... option and Show Current Period... option to refresh the pane.
If Current Period Input is greyed out, no correction yet exists for that period.
Step 2 - Add the ad hoc correction to the period
Right-click: New in the pane. The New Payment Record dialogue appears.
Select the desired Ad HocPayment heading from the drop-down list.
These headings are created under the Addition Headings' Ad Hoc Payments section.
Click the Next button. The New Payment Record form appears with the Paid from and Paid to dates defaulted to the correction period you have already selected.
Select a Post, if necessary.
Enter the Input Amount.
Enter any Notes, if applicable.
Click the OK button. The record appears in the Payment and Rates tab.
Click the OK button to exit the form.
Calculate the payslip (see below).
Creating an ad hoc correction directly to the payroll in the current month
Navigate to the Payments and Rates tab on the employee's Payroll Period Input and Corrections form.
Go to Cintra iQ: Employment record > Forms > Payroll Period Input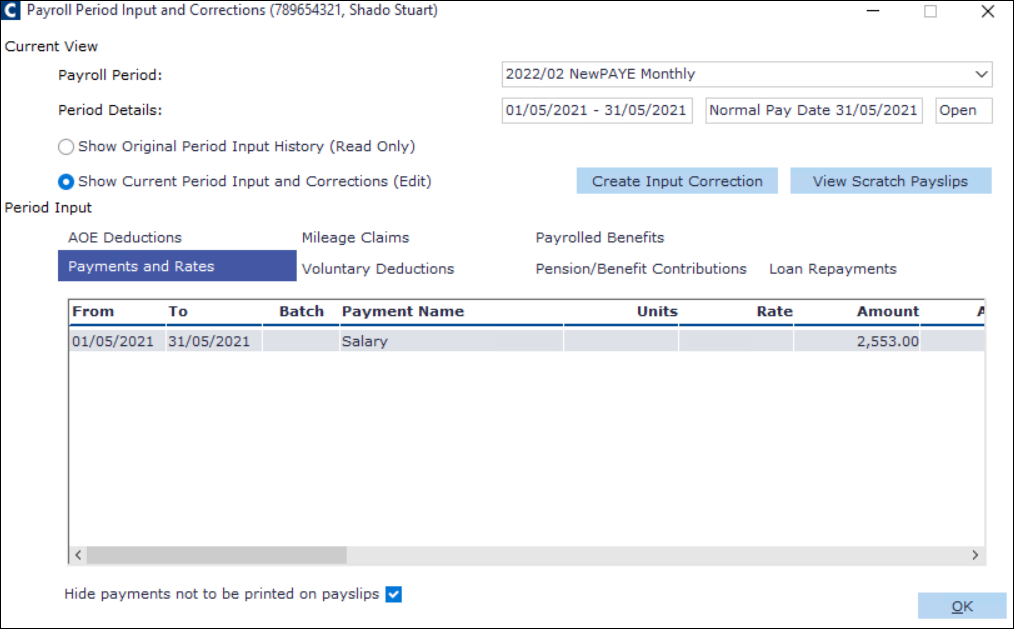
Right-click: New in the pane. The New Payment Record dialog appears.
Select the desired Ad HocPayment Heading from the drop-down list.
These headings are created under the Addition Headings' Ad Hoc Payments section.
Click the Next button. The New Payment Record form appears for the selected heading.
Enter the desired Input Amount that is to be deducted from the payslip. e.g. -500.00.
Click the OK button. The record appears in the Payments and Rates tab.
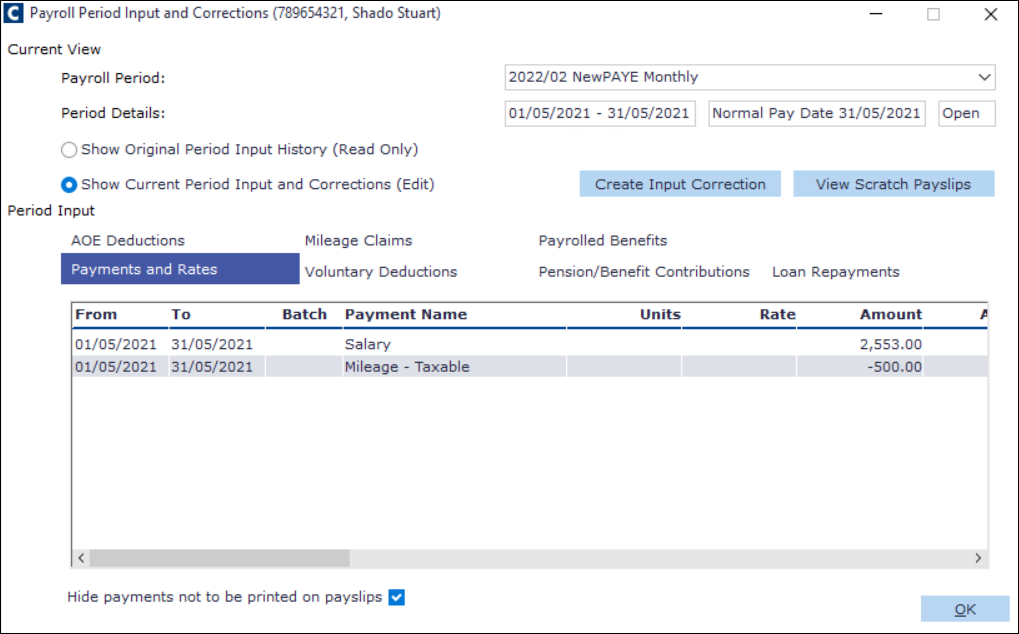
Click the OK button.
Calculate the payslip (see below).
Creating payment corrections via post history
Changes to Post History can be related to salary, spine points or work patterns.
Example: Last month, an employee had reduced their hours from full time to part time halfway through the pay period. You need to go back and make a correction. For this example, we are using Work Patterns as we are trying to get money on the payslip to show the actual correction.
Navigate to the Working Pattern tab on the employee's Post History form (Employment record > Forms > Post History).
Close the current work pattern record
Select the desired Post.
Open the Working Pattern record associated to the Post. The Edit Employee Post FTE form appears.
Enter the To Date.
Click the OK button. A message appears stating the FTE factor has been calculated.
Click the OK button. The Work Pattern record is now closed.
Create a new work pattern record
Right-click in the the work pattern pane, then select New.
In the Insert Employee Post FTE form, enter a From Date and To Date for the period you wish to correct.
Select the desired Work Pattern.
Select FTE Calculation Method: Direct Entry.
For more information about FTE Calculation Methods, see What are the FTE calculation methods?
Enter the FTE factor.
Click the OK button. The new Working Pattern record is created.
Calculate the payslip (see below).
Creating corrections via the calendar
Create the employee's Calendar event.
Navigate to the employee's Employment Calendar form.
Go to Cintra iQ: Employment record > Forms > Calendar
Right-click: New Calendar Event in the desired date. The Select Attendance Category pop up appears.
Select Sickness from the drop-down list.
Click the Next button. The New Sickness form appears.
Fill in the desired information, including the last known date of absence and return to work date.
Ensure the Return to work date is entered.
Click the OK button. The Sickness Calendar event is created.
Calculate the pay for the pay period on the employee's Payslip when the Sickness event took place.
The Sickness (SSP) payment is recalculated and is displayed as a correction, on the Gross to Net Summary tab.
The tax, NI and pension contributions are adjusted accordingly to reflect the earnings in the pay period and display what has been corrected.
Note: Student loans are not affected during a correction.
Calculate the payslip (see below).
Creating corrections via payments and rates
Create / amend employee payroll entry
Create or amend the employee's payroll entry via Payments and Rates.
Navigate to the Set up Individual Allowances and Rates tab within the employee's Standing Allowance and Rates form.
Go to Cintra iQ: Employment record > Forms > Payments and Rates
Select the Show all allowances and rates headings option.
Select the desired Allowance/Rate Name in the left-hand pane.
Right-click: New in the right-hand pane. The New Post Holder Specific form appears.
Note: Depending on how the addition heading is set up, the form is updated accordingly to reflect the Addition Type as Monetary Amount or Units Times Rates.
Important! If you need to amend a record, enter a To date to close it, save, and then right-click: New.
Enter the Paid from Date and Paid to Date.
Fill in the information.
Click the OK button. The Allowance and Rates record is created.
Click the OK button.
Calculate the payslip (see below).
Depending on how you set up your correction process, the method of amending the correction back to the pre-correction values differs slightly.
Early Year Updates / Correcting for previous tax years
The Earlier Year Update (EYU) was previously used to correct payroll data for a tax year after the 19 April deadline following that year's end. It's no longer a valid submission type. From April 2021 the Earlier Year Update will no longer be a valid submission type for the tax year 2020 to 2021, and the same applies to every tax year since. For more information, see GOV.UK's website.
Corrections are now made by sending a further year to date Full Payment Submission (FPS) instead. Rather than reporting just the difference (as the EYU did), the correcting FPS sends the difference between what was originally submitted and the correction, alongside the employee's updated year-to-date figures. See How do I submit an EPS/FPS to HMRC?
The EYU remains relevant only for historical corrections to tax years up to 2020/21. Anything from 2021/22 onwards goes through an additional FPS.
Viewing an employee's corrections?
To view all corrections made against an individual employee's payslips,
You can also access the Correction Report for an entire payroll.
Calculate and view the employee's payslip
Open the employee's Payslip Period Summary form.
Go to Cintra iQ: Employment record > Forms > Payslip
Click the Calculate button. The following occurs:
The payments are recalculated and display what has been corrected, on the Gross to Net Summary tab.
The tax, NI and pension contributions are adjusted accordingly to reflect the earnings in the pay period and display what has been corrected.
Note: Student loans are not affected during a correction.
Expand a payment/deduction to view the correction. Double-click it for more information.